Blog

  • Foundation Grading: How Improper Slope Causes Basement Flooding

    Foundation Grading: How Improper Slope Causes Basement Flooding

    The slope of the ground around your foundation is one of the most powerful factors in whether your basement stays dry. Poor grading — where the yard slopes toward the house rather than away — can cause serious water intrusion that no interior drainage system fully solves. This guide explains how to identify grading problems and fix them yourself or with a contractor.

    What Is Foundation Grading?

    Foundation grading refers to the slope of the soil directly adjacent to your home’s foundation. Proper grading directs rainwater and snowmelt away from the structure. Improper grading (negative grade) funnels water toward the foundation, where it pools against the wall and eventually penetrates.

    The Rule of Thumb: The 6-Inch-in-10-Feet Standard

    The International Residential Code (IRC) requires a minimum slope of 6 inches of fall within the first 10 feet from the foundation. In practical terms, this means if you place a 10-foot board against your foundation at grade level, the far end should be at least 6 inches lower than the end touching the house. Many older homes fail this standard — especially after years of soil settlement.

    Signs Your Grading Is the Problem

    • Water stains appear on basement walls directly after rainfall (not delayed by days)
    • You can see soil or mulch touching or covering siding above the foundation
    • Puddles form against the house after rain
    • Window wells fill with water during storms
    • One specific wall always gets wet (the wall facing a slope)
    • Wet basement issues are seasonal, tied directly to rainfall, not a constantly high water table

    How to Fix Grading: DIY Options

    Option 1: Add Soil (Most Common DIY Fix)

    Adding compactable fill soil to create positive grade is the most direct fix. Use clean fill soil or topsoil (not sandy soil, which drains quickly, and not heavy clay, which retains water). Add soil in 2-inch lifts, compacting each layer before adding more. Build up enough to achieve the 6-inch-in-10-feet slope before planting grass or placing mulch.

    • A typical grading correction for one side of a house: 2–5 cubic yards of fill
    • Fill cost: $30–$70 per cubic yard delivered
    • DIY labor: 4–8 hours per side with a wheelbarrow and tamper

    Option 2: Swales

    A swale is a shallow, wide channel dug to redirect surface water flow around the house rather than toward it. Swales work well on lots where adding soil to create slope isn’t practical (tight lot, existing patios). The swale is typically 2–4 feet wide and 6–12 inches deep, sloped at least 2% away from the house. Line with grass or gravel for stability.

    Option 3: Window Well Covers and Extensions

    Window wells that collect water often need covers (polycarbonate bubble covers, $30–$80 each) and proper drainage inside the well itself. The well should have a gravel base at least 6 inches deep. Some window wells drain to the foundation’s footing drain; others drain to a small separate pipe. If yours fills with water, this is a separate drainage problem from general grading.

    Professional Grading Costs

    ScopeCost RangeTimeline
    Grading one side (fill and grade)$500–$2,0001 day
    Full perimeter grading correction$1,500–$5,0001–3 days
    Full grading + swales + drainage$3,000–$10,0002–5 days
    Grade + sod or seed restorationAdd $500–$3,000Additional 1–2 days

    Grading + Downspout Extensions: A Powerful Combination

    Correcting the grade delivers maximum benefit when combined with properly extended downspouts. Each downspout from your roof can dump 500–1,000 gallons of water in a single storm. Extend downspouts at least 6 feet from the foundation — 10 feet is better. Underground drainage pipes from downspouts to a drywell or daylight outlet solve the problem permanently.

    If grading improvements don’t fully solve the problem, you may need to look at exterior foundation waterproofing or an interior drainage system to manage remaining groundwater. Check our 12 warning signs guide to understand what type of water problem you actually have.

  • Exterior Drainage Systems for Basements: French Drains, Curtain Drains, and Surface Drainage

    Exterior Drainage Systems for Basements: French Drains, Curtain Drains, and Surface Drainage

    Water in your basement often originates well away from your foundation — in your yard, on a neighbor’s slope, or in a low area that concentrates runoff. Exterior drainage systems intercept this water before it ever reaches your foundation. Here is how the main systems work, what they cost, and when each is the right tool.

    Surface Drainage vs. Subsurface Drainage

    All exterior drainage systems address one of two problems:

    • Surface drainage moves water that is pooling or flowing across the ground before it soaks in. Tools: grading, swales, channel drains.
    • Subsurface drainage captures water that has already entered the soil and is moving through the ground toward your foundation. Tools: French drains, curtain drains, footing drains.

    Exterior French Drain (Perimeter or Yard)

    An exterior French drain is a trench filled with gravel and a perforated pipe, installed in the yard to intercept groundwater before it reaches the foundation. Unlike an interior French drain (which manages water that has already entered under the slab), an exterior drain keeps water out of the soil zone around the foundation entirely.

    How It Works

    • A trench is dug in the yard, upslope from the foundation, 2–4 feet deep
    • A perforated pipe (4-inch diameter) is laid in the trench, sloped to drain water away
    • The trench is filled with gravel and covered with filter fabric to prevent soil clogging
    • Water enters the pipe through the perforations and drains to daylight or a dry well

    Cost

    • DIY: $10–$30 per linear foot (materials only)
    • Contractor-installed: $30–$100 per linear foot
    • A 50-foot run: $500–$5,000 depending on depth and complexity

    Curtain Drain (Interceptor Drain)

    A curtain drain is an exterior French drain installed perpendicular to the natural water flow — it “intercepts” water flowing across the yard from a slope or neighboring property. It is typically installed 10–20 feet uphill from the foundation and runs across the full width of the property to redirect flow around rather than through the yard.

    Curtain drains are the right solution when water in your basement is caused by runoff from a sloped yard or hill behind the house — a situation where no amount of interior drainage or foundation waterproofing fixes the root cause.

    Cost

    • $1,500–$8,000 for a typical residential curtain drain (50–150 linear feet)
    • Cost rises significantly if the drain must go through a patio, hardscaping, or tree root zones

    Channel Drains (Trench Drains)

    Channel drains are linear surface drains — a narrow trench with a grated cover — installed where water concentrates on a hard surface. Common locations: at the base of a driveway that slopes toward the garage, along a patio adjacent to the house, or at the entry to a walkout basement.

    • Cost: $30–$100 per linear foot installed; $500–$3,000 for a typical residential installation
    • Best for: Hardscaped areas where a French drain can’t be installed

    Dry Wells

    A dry well is an underground pit filled with gravel (or a perforated plastic chamber) where drainage systems discharge water for slow infiltration into the soil. French drains, curtain drains, and downspout extensions can all outlet to a dry well. They work well in soil with good percolation — less effective in clay-heavy soils where water drains slowly.

    • DIY cost: $200–$500 for materials (pre-made plastic dry well chamber)
    • Contractor cost: $500–$2,500 depending on size and excavation difficulty

    Which System Do You Need?

    Problem DescriptionBest Solution
    Water flows across yard from slope aboveCurtain drain uphill from foundation
    Water pools in yard near foundationExterior French drain + regrading
    Driveway channels water toward garageChannel drain at garage entry
    Downspouts dump near foundationDownspout extensions to dry well
    Water table rises under entire basementInterior drainage + sump pump system
    Foundation wall leaks despite good gradeExterior waterproofing membrane

    Many basements need a combination of exterior drainage to manage surface and near-surface water, plus an interior drainage system to handle any groundwater that still reaches the foundation. See our interior vs. exterior comparison to understand which approach addresses your specific situation.

  • Exterior Foundation Waterproofing: Methods, Costs, and When It’s Worth It

    Exterior Foundation Waterproofing: Methods, Costs, and When It’s Worth It

    Exterior foundation waterproofing is the most comprehensive — and most expensive — way to protect your basement. It stops water at the source, before it ever contacts your foundation. This guide covers the main methods, what each costs, and the situations where exterior waterproofing is genuinely the right call.

    What Exterior Waterproofing Involves

    All exterior waterproofing methods share a common process: excavating down to the foundation footing (8–12 feet in most homes), preparing the foundation wall surface, and then applying waterproofing materials. The differences are in what gets applied to the wall and how drainage is managed.

    Method 1: Asphalt-Based Waterproofing Membrane

    The traditional method — a rubberized asphalt coating (similar to damp-proofing but thicker and true waterproofing) is troweled or spray-applied to the clean foundation wall. A drainage board (dimple mat) is then placed against the membrane to channel water down to the footing drain. This is the most common method on new construction and re-waterproofing projects.

    • Cost: $80–$150 per linear foot of foundation
    • Lifespan: 10–20 years depending on product quality and backfill conditions
    • Best for: Most foundations with accessible perimeter

    Method 2: EPDM or Thermoplastic Sheet Membrane

    Rubberized sheet membranes (like EPDM rubber or thermoplastic polyolefin) are bonded or mechanically fastened to the foundation wall. They provide excellent coverage on flat surfaces and around corners. More expensive than spray-applied but longer-lasting.

    • Cost: $100–$200 per linear foot
    • Lifespan: 20–40 years
    • Best for: Premium installations, high water table areas

    Method 3: Bentonite Clay Panels

    Bentonite is a natural clay that swells when wet, self-sealing gaps and cracks. Bentonite panels are nailed to the foundation wall and self-activate when backfilled soil introduces moisture. Rarely used in residential re-waterproofing but common in commercial construction.

    • Cost: $90–$160 per linear foot
    • Lifespan: Very long if soil remains stable
    • Best for: New construction, commercial foundations

    The Critical Component: The Footing Drain

    No exterior waterproofing system works without a functioning footing drain (also called a footer drain or exterior French drain). This perforated pipe sits at the base of the foundation footing and collects water that has migrated down through the soil. Without it, even a perfect wall membrane eventually fails as water pressure builds at the footing.

    If your original footing drain has failed (most homes built before 1980 have failed footing drains), exterior waterproofing includes installing new drainage. The pipe drains to daylight (a sloped outlet away from the house) or to a sump pit inside the basement.

    Exterior Waterproofing Cost by Project Scope

    Project ScopeCost RangeNotes
    One wall (30–40 linear feet)$5,000–$15,000Only effective if that wall is the sole problem
    Full perimeter (120 linear feet average home)$15,000–$40,000Most comprehensive; 7–10 days of work
    Full perimeter + landscaping restoration$20,000–$60,000Includes replacing sod, shrubs, patios
    Full perimeter with high water table$25,000–$70,000+Dewatering required during excavation

    Is Exterior Waterproofing Worth It?

    Exterior waterproofing makes sense when:

    • The original exterior membrane has clearly failed (home 25+ years old with worsening water intrusion)
    • You are already doing excavation work (foundation repair, utility work, major landscaping)
    • You want to finish the basement to living space and need absolute assurance of dryness
    • Interior methods have been tried and failed
    • The home is in an area with consistently high water table

    For most homeowners with a wet basement, an interior drainage system provides 85–90% of the protection at 20–30% of the cost. See our full cost comparison guide to weigh both options with real numbers.

  • Sump Pump Not Working? Troubleshooting Guide for Every Common Problem

    Sump Pump Not Working? Troubleshooting Guide for Every Common Problem

    Your sump pump is not running and water is rising in the pit. Or the pump is running but not draining. Or it runs continuously and won’t shut off. Each symptom points to a specific cause — and most can be diagnosed in minutes. Use this guide to find the problem fast.

    Quick Diagnosis: What Is Your Pump Doing?

    Problem A: Pump Won’t Turn On

    Check in this order:

    • Is it plugged in? Vibration from running can slowly walk a plug out of an outlet. Check the outlet is receiving power by plugging in a lamp or phone charger.
    • Is the GFCI outlet tripped? Sump pumps should be on GFCI outlets. Find the outlet and press the Reset button — a tripped GFCI has no visible indicator in some models.
    • Is the circuit breaker tripped? Check your panel. Sump pumps can trip a breaker if they draw too much current (failed motor, heavy load).
    • Is the float stuck? The float is the round or cylindrical ball that rises with water to trigger the pump. Reach into the pit and manually lift the float — if the pump turns on, the float is stuck or needs adjustment.
    • Is the pump seized? If you hear a humming sound but the pump doesn’t move water, the impeller may be jammed. Unplug, remove, and manually turn the impeller with a screwdriver. If it’s frozen, the motor bearings may be failed.

    Problem B: Pump Runs But Won’t Drain the Pit

    • Clogged intake screen: The most common cause. Unplug the pump, remove it, and clean the screen at the bottom with a garden hose. Most clogs are fine silt or debris.
    • Failed check valve: The check valve prevents water from flowing back from the discharge line into the pit. If the valve fails open, the pump drains water up the pipe and it flows right back. Listen for a “gurgling” sound — that is water backflowing. Replace the check valve ($15–$40).
    • Discharge line blocked: The exterior end of the discharge pipe can be blocked by debris, ice, or a pest nest. Find the exterior outlet and check for obstruction.
    • Pump is undersized: If the pit fills faster than the pump can drain it during heavy rain, the pump’s GPH rating is too low for your inflow rate. See our buyer’s guide for sizing guidance.

    Problem C: Pump Runs Constantly

    • Float stuck in the “on” position: Unplug the pump and check if the float is tangled around the pump body or caught on the discharge pipe. Reposition it so it can swing freely.
    • Float set too low: If the float activates at too low a water level, the pump may cycle on immediately after draining. Adjust the float height upward (tethered floats: lengthen the tether slightly).
    • High water table: In some properties, the water table is so high that groundwater continuously seeps in, keeping the pump running. This is normal behavior if the pump is keeping up with inflow — but consider a higher-capacity pump or checking that your drain system is not connected to a plumbing source.

    Problem D: Pump Makes Noise but Won’t Run

    • Humming/buzzing: Motor is getting power but impeller is stuck. May be debris or a seized bearing. Try freeing the impeller with a long screwdriver. If it still won’t spin freely, the motor is likely failed.
    • Grinding or rattling: Debris in the impeller. Remove, clean, and reinstall.
    • Clicking: Often a stuck relay or failed start capacitor. Usually means motor replacement or pump replacement.

    Emergency Procedures While You Wait for Repair

    • Rent a portable submersible pump from Home Depot or Lowe’s ($40–$60/day) to manage immediate flooding
    • Move valuables off the basement floor immediately
    • Turn off basement electrical circuits if water is near outlets or panels
    • Call your homeowner’s insurance — flooding from equipment failure may be covered

    When to Replace Instead of Repair

    Replace the pump (rather than repair) when: the pump is more than 7 years old, the motor is failed or seized after cleaning, the cost of repair parts exceeds 50% of a new pump’s price, or the pump has a history of recurring failures. A quality submersible sump pump costs $150–$400 and takes 30–60 minutes to install. See our 2026 recommendations for top-rated models by price range.

  • Basement Waterproofing Warranties: What They Actually Cover (And What They Don’t)

    Basement Waterproofing Warranties: What They Actually Cover (And What They Don’t)

    A “lifetime warranty” is the most powerful marketing tool in the basement waterproofing industry — and one of the least understood. Before signing a contract based largely on warranty promises, you need to know what these warranties actually cover, what voids them, and what happens when the company behind them goes out of business.

    Types of Basement Waterproofing Warranties

    1. Workmanship Warranty

    Covers defects in how the system was installed. If the crew failed to slope the drain pipe properly or left a gap in the drainage channel, a workmanship warranty covers the repair. These are typically 1–5 years. Many contractors only offer this type.

    2. Material Warranty

    Covers the components themselves — the drain pipe, the sump pump, the liner. A pump manufacturer might warrant the unit for 3–5 years. This warranty runs through the manufacturer, not the installer. If the installer goes out of business, the manufacturer warranty may still be in force.

    3. “Lifetime” or “Dry Basement” Warranty

    This is the big one contractors advertise. What “lifetime” means varies dramatically by company:

    • Some mean the life of the system (10–25 years)
    • Some mean your lifetime as the current homeowner
    • Some mean the life of the structure (true lifetime)

    Read the warranty document, not the sales pitch. Look for the definition of “lifetime.”

    Common Warranty Exclusions

    ExclusionHow CommonWhat to Ask
    Flooding caused by power outageVery common“Does the warranty cover pump failure during outages?”
    Sump pump failure (separate warranty)Common“Is the pump covered under this same warranty?”
    Structural cracks or wall movementVery common“What if the crack re-opens due to foundation movement?”
    Water damage to belongingsAlways excludedGet a homeowner’s insurance rider for this
    Acts of nature or catastrophic floodCommonUnderstand what “normal” leakage means
    Failure to maintain sump pumpVery common“What maintenance is required to keep the warranty valid?”

    Transferable vs. Non-Transferable Warranties

    A transferable warranty passes to the new buyer when you sell your home. This is a significant selling point — buyers will pay more for a home with a documented, transferable dry basement warranty. Many national waterproofing companies offer this; many local contractors do not.

    A non-transferable warranty ends when you sell. If the buyer discovers a problem after closing, they have no recourse against the contractor. Always ask if the warranty transfers and get it in writing.

    What Happens If the Contractor Goes Out of Business?

    This is the most common warranty nightmare in the basement waterproofing industry. A company sells a “lifetime warranty,” operates for a few years, then closes or reorganizes under a new name. Your options:

    • National franchise networks sometimes honor warranties from affiliated local franchisees, but this varies by franchisor. Ask specifically how this works.
    • Insurance-backed warranties — some contractors purchase third-party warranty insurance that remains in force even if the contractor closes. Ask if the warranty is backed by an insurance policy and get the insurance company name.
    • Small claims court — for workmanship issues within the statute of limitations, you may have legal recourse even against a closed contractor if personal assets exist.

    Warranty Red Flags

    • Warranty is only verbal, not written
    • Warranty document is not provided before signing the contract
    • “Lifetime” undefined in the document
    • Company has been in business under its current name for less than 5 years
    • Warranty requires expensive annual maintenance by the same contractor to remain valid

    For guidance on comparing contractor bids, see our guide on how to hire a waterproofing contractor. For typical costs and what is included in a professional system, see our complete cost guide.

  • How to Hire a Basement Waterproofing Contractor: Red Flags and Must-Ask Questions

    How to Hire a Basement Waterproofing Contractor: Red Flags and Must-Ask Questions

    The basement waterproofing industry has more bad actors than almost any home improvement sector. High-pressure sales tactics, oversold solutions, and lifetime warranties from companies that close in five years are all common. This guide gives you the tools to separate legitimate contractors from those to avoid.

    Red Flags: Walk Away Immediately

    • Door-to-door sales or unsolicited cold calls — legitimate waterproofing companies get work through referrals and advertising, not knocking on doors after heavy rain.
    • Same-day decision pressure — “This price is only good today” is a manipulation tactic. Any honest contractor will give you time to compare bids.
    • No physical business address — search the company name and verify the address exists. Many fly-by-night operators list a UPS mailbox as their address.
    • Cash-only payment requirement — legitimate contractors accept credit cards and checks. Cash-only jobs leave you no recourse if work is defective.
    • “Lifetime warranty” from a new company — a warranty is only as good as the company behind it. Ask how long the company has been in business under its current name.
    • Diagnosis without entering the basement — any contractor who recommends a $10,000 system without inspecting the exterior, measuring the slope, and checking the actual water entry points is guessing.

    Must-Ask Questions Before Signing

    About Credentials

    • “Are you licensed and insured in [your state]?” — Ask for the license number and verify it on your state’s contractor licensing board website.
    • “Are you a member of the Basement Health Association (BHA)?” — BHA membership requires adherence to a code of ethics.
    • “Can you provide three local references from projects completed in the past 12 months?” — Then actually call them.

    About the Proposed Solution

    • “What is causing my basement water problem?” — A good contractor explains the root cause (hydrostatic pressure, window well overflow, plumbing, grading, etc.) before proposing a solution.
    • “What happens if this system fails?” — They should have a clear warranty process and a local service team.
    • “Will you provide a written scope of work before I sign?” — Everything should be in writing: materials, dimensions, who does the work (them or subcontractors), timeline.
    • “What do I do while waiting for installation?” — A good contractor helps you manage the immediate problem.

    About the Contract

    • “Is there a cancellation period?” — Federal law and most state laws require a 3-day right of rescission on contracts signed in your home. The contract must state this.
    • “What is the payment schedule?” — Never pay more than 30–50% upfront. Final payment should be due after your inspection of completed work.
    • “Is the warranty transferable if I sell my home?” — A transferable warranty adds value at sale time.

    How to Get Multiple Bids the Right Way

    Get a minimum of three bids. Do not simply choose the lowest number — compare what is actually included:

    Item to CompareWhy It Matters
    Linear feet of drain includedPartial perimeter is cheaper but less effective
    Sump pump brand and modelAsk about HP rating and GPH capacity
    Battery backup included?Critical for power outages during storms
    Who does the work?Subcontracted crews = less quality control
    Warranty term and what it covers“Transferable lifetime” vs. “5-year parts only”
    Concrete restoration included?Some quotes exclude floor patching

    National vs. Local Contractor

    National chains (Basement Systems, Dry Pro, Ohio Basement Authority) offer standardized products, professional sales processes, and transferable warranties. They tend to cost 20–40% more than local contractors. Local specialists often have lower overhead, faster scheduling, and owners who are on-site. The best outcome is usually a locally-owned company with 10+ years in business and verifiable references.

    Before getting quotes, understand typical pricing in your area. See our basement waterproofing cost guide and our French drain cost breakdown so you can identify bids that are significantly above or below market rate.

  • Sump Pump Maintenance Checklist: How to Test and Extend Your Pump’s Life

    Sump Pump Maintenance Checklist: How to Test and Extend Your Pump’s Life

    A sump pump that fails during a heavy storm is one of the most expensive home failures a homeowner can experience — thousands in water damage from a pump that costs $200 to replace. Regular maintenance catches 90% of failures before they happen. Here is exactly what to do and when.

    How Often to Test Your Sump Pump

    • Once a month: Quick pour test (30 seconds)
    • Every spring: Full maintenance inspection before rainy season
    • After every major storm: Verify pump cycled and pit is draining
    • Every 3–5 years: Professional inspection or pump replacement

    Monthly Quick Test

    This takes less than a minute. Pour a 5-gallon bucket of water slowly into the sump pit. The pump should activate before the water level reaches the float arm and should drain the pit within 1–2 minutes. If the pump doesn’t turn on, doesn’t turn off, or takes more than 3 minutes to drain a standard pit, it needs attention.

    Annual Spring Maintenance Checklist

    Step 1: Check the Power Source

    • Confirm the pump is plugged into a dedicated GFCI outlet
    • Test the GFCI by pressing the Test and Reset buttons
    • Check that the cord is not pinched, frayed, or sitting in standing water
    • If you have a battery backup, test the backup unit (disconnect main power and pour water)

    Step 2: Inspect the Pit

    • Remove the pit cover and check for debris, dirt, or gravel that has migrated into the pit
    • Clean any debris with a wet/dry vacuum — debris can clog the intake screen
    • Check the pit walls for cracks or erosion

    Step 3: Inspect the Pump

    • Lift the pump out of the pit (unplug first)
    • Clean the intake screen at the bottom of the pump with a garden hose
    • Check that the float is not tangled, stuck, or coated with debris
    • Inspect the impeller (the spinning fan inside) for wear or debris — a screwdriver can free most obstructions
    • Lower the pump back into the pit, ensuring it sits level

    Step 4: Check the Discharge Line

    • Trace the discharge pipe from the pump to where it exits the foundation
    • Verify the pipe pitches consistently downward (no sags that trap water)
    • Confirm the exterior discharge point is at least 10 feet from the foundation
    • Check the check valve — a functioning check valve prevents water from flowing back into the pit when the pump stops
    • Clear any debris or ice blockage at the exterior outlet (critical in winter)

    Step 5: Test the Float and Switch

    • Manually lift the float to verify the pump activates immediately
    • For vertical float switches, check that the switch moves freely up and down without binding on the pump body
    • For tethered float switches, verify the tether is the correct length (too short = pump runs constantly; too long = pit overflows)

    When to Replace Your Sump Pump

    Warning SignLikely CauseAction
    Pump runs but doesn’t drain pitWorn impeller or clogged intakeClean intake; if problem persists, replace
    Pump runs continuouslyFloat stuck on / too low / high water tableAdjust float; check for ground water issue
    Pump never turns onFailed motor, tripped breaker, bad floatTest float manually; check outlet
    Loud grinding or rattling noiseDebris in impeller or failing bearingsClean impeller; replace if noisy after cleaning
    Pump is 7+ years oldNormal wearProactive replacement (don’t wait for failure)

    Battery Backup: The Most Important Upgrade

    Pumps fail most often during the storms that cause flooding — precisely when power outages happen. A battery backup sump pump system ($200–$500) is the single most valuable upgrade for any basement with water issues. A backup pump typically runs on a 12V marine battery and activates automatically when the primary pump fails or power goes out.

    For help choosing a replacement pump or battery backup, see our 2026 sump pump buyer’s guide. If you are building out a full system, our interior drainage guides explain how the drain system feeds into the sump pit.

  • Interior vs. Exterior Waterproofing: Which Is Right for Your Basement?

    Interior vs. Exterior Waterproofing: Which Is Right for Your Basement?

    When your basement takes on water, you face a fundamental choice: manage water on the inside or stop it at the source outside. Both approaches work, but they solve different problems at very different price points. This guide breaks down exactly when each is the right call.

    The Short Answer

    • Interior waterproofing is the practical, cost-effective solution for most homeowners. It manages water that enters by redirecting it to a sump pump. Cost: $5,000–$15,000.
    • Exterior waterproofing stops water at the source by excavating around the foundation and applying a waterproof membrane. It is more comprehensive but also more expensive and disruptive. Cost: $15,000–$50,000+.

    How Interior Waterproofing Works

    Interior waterproofing does not prevent water from entering the wall — it intercepts water after it enters and drains it safely away before it reaches your floor. The system works like this:

    • A channel is cut into the perimeter of your basement floor
    • A perforated drain pipe (French drain) is installed in the channel
    • Gravel is packed around the pipe
    • Concrete is poured over the channel, leaving the pipe accessible
    • Water that seeps through walls or up through the floor drains to a sump pit
    • A sump pump ejects the water outside

    Interior Waterproofing Advantages

    • Lower cost (typically 1/3 to 1/5 the cost of exterior)
    • No excavation — work is done inside, no landscaping or deck removal
    • Work can be completed in 1–3 days
    • Highly effective for managing high water table situations
    • Can be installed year-round (no frozen ground concerns)

    Interior Waterproofing Limitations

    • Does not stop water from entering the wall or soil contact side of foundation
    • Walls may still show efflorescence or minor staining
    • Dependent on sump pump function (power outages are a risk without a battery backup)
    • Does not address exterior soil drainage issues

    How Exterior Waterproofing Works

    Exterior waterproofing gets to the root of the problem by creating a barrier between the soil and your foundation. The process involves:

    • Excavating around the entire perimeter of the foundation (down to the footing)
    • Cleaning and repairing the foundation wall surface
    • Applying a waterproof membrane (asphalt-based, rubber, or crystalline)
    • Installing a drainage board or dimple mat to direct water downward
    • Installing an exterior footing drain (also called a footer drain or tile drain)
    • Backfilling with gravel, then soil

    Exterior Waterproofing Advantages

    • Stops water before it contacts the foundation
    • Addresses root cause — damaged exterior waterproofing membrane or failed footing drains
    • Can also correct grading issues during backfill
    • Best long-term solution for foundations in areas with high rainfall or poor drainage

    Exterior Waterproofing Limitations

    • Requires excavating to the footing — 8–12 feet deep in many homes
    • Destroys landscaping, patios, decks, and driveways next to the foundation
    • Takes 3–10 days depending on house size
    • Cost is 3–5x higher than interior systems
    • Difficult or impossible on some properties (attached homes, tight lots, underground utilities)

    Cost Comparison

    FactorInterior SystemExterior Waterproofing
    Average cost (full perimeter)$5,000–$15,000$15,000–$50,000+
    Installation time1–3 days3–10 days
    Excavation requiredNoYes (down to footing)
    Landscaping impactNoneSignificant
    Effective for high water tableYes (with sump pump)Partially
    Stops wall moisture/stainingPartiallyYes

    Which Should You Choose?

    Choose interior waterproofing if:

    • Your primary goal is keeping the floor dry
    • You have a high water table (water comes up through the floor or cove joint)
    • Budget is a concern
    • You cannot lose landscaping or hardscaping
    • You need the work done quickly

    Choose exterior waterproofing if:

    • Your original exterior membrane has failed (home is 20–30+ years old)
    • You are doing major renovation work that already requires excavation
    • You want the walls completely dry, not just the floor
    • You are finishing the basement to living space and need absolute waterproofing
    • A structural engineer has recommended exterior work

    For most homeowners with a leaking basement, an interior French drain system with a quality sump pump delivers 90% of the protection at 30% of the cost. See our full cost guide for regional pricing data.

  • Basement Sump Pit Installation: DIY Guide and What Contractors Charge

    Basement Sump Pit Installation: DIY Guide and What Contractors Charge

    A sump pit (or sump basin) is the collection point for your basement waterproofing system. Without a properly sized, correctly installed pit, even the best sump pump will underperform. This guide covers how to install a sump pit yourself and what it costs to have a contractor do it.

    What Is a Sump Pit?

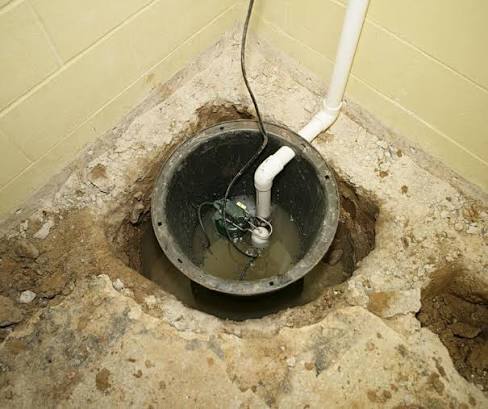
    A sump pit is a hole dug into the lowest point of your basement floor, typically 18–24 inches in diameter and 24–36 inches deep. It collects water that drains in through your interior perimeter drain or seeps up through the floor. The sump pump sits inside the pit and ejects water out through a discharge pipe.

    Sump Pit Sizing Guide

    Basement SizePit DiameterPit DepthRecommended Liner
    Up to 800 sq ft18 inches24 inches18″ round plastic liner
    800–1,500 sq ft24 inches30 inches24″ round plastic liner
    1,500–2,500 sq ft24–30 inches30–36 inchesLarge basin with drainage holes
    Over 2,500 sq ft or high water30+ inches36+ inchesContractor-installed concrete

    DIY Sump Pit Installation

    Tools and Materials

    • Rotary hammer drill with concrete chisel bit
    • Jackhammer (rental: $50–$100/day) or sledgehammer
    • Shovel and bucket for soil removal
    • Plastic sump basin with pre-drilled holes ($30–$80)
    • Gravel (pea gravel, 1/2 bag minimum)
    • Concrete mix for patching around the basin
    • Level

    Step 1: Choose the Location

    The sump pit must be at the lowest point in the basement, typically in a corner. It needs to be at least 8 inches from any wall to accommodate the basin and pump. Avoid placing it near electrical panels or water heaters. Check for underground utilities before digging.

    Step 2: Break the Concrete

    Use a rotary hammer or rented jackhammer to break through the concrete slab. Most basement slabs are 4 inches thick. Mark a circle 2–3 inches larger than your basin diameter to allow for gravel backfill and leveling. Remove concrete chunks and set aside.

    Step 3: Dig the Hole

    Dig down 6 inches deeper than your basin height to allow for a gravel base. The soil beneath most basements is dense and may require a digging bar. Remove soil and dispose of it — do not dump it near the foundation. Add 6 inches of pea gravel to the bottom of the hole.

    Step 4: Set and Level the Basin

    Lower the plastic basin into the hole. Check level in both directions. The top of the basin should sit flush with or slightly below the finished floor surface. Backfill around the basin with gravel, then compact lightly. Fill gravel holes in the basin sides if your basin didn’t come pre-drilled — drill 1/2-inch holes every 4–6 inches around the lower 2/3 of the basin.

    Step 5: Pour Concrete and Finish

    Mix concrete and pour it around the basin rim, feathering it smooth to meet the existing floor. Allow 24 hours to cure before setting the pump. Install a tight-fitting lid on the basin (required by many building codes and important for radon mitigation).

    Contractor Costs for Sump Pit Installation

    ServiceCost RangeNotes
    Sump pit only (no pump)$300–$700Includes excavation, basin, concrete patching
    Pit + submersible pump installation$600–$1,500Most common installation
    Pit + battery backup system$900–$2,500Recommended for flood-prone areas
    Full interior drainage + pit + pump$4,000–$12,000Complete system installation

    Once your sump pit is installed, choosing the right pump is the next step. See our sump pump buyer’s guide for 2026 recommendations, or learn about interior drainage systems that feed into the pit.

  • Basement Wall Crack Injection: Epoxy vs. Polyurethane — Which Should You Use?

    Basement Wall Crack Injection: Epoxy vs. Polyurethane — Which Should You Use?

    Crack injection is the gold standard for repairing basement wall cracks from the inside. Two products dominate the market: epoxy and polyurethane foam. They look similar during application but behave very differently — choosing the wrong one can mean a failed repair within a year. Here is exactly how to decide.

    The Core Difference: Structural vs. Waterproofing

    This single distinction drives the entire decision:

    • Epoxy restores structural integrity. It bonds concrete back together with a tensile strength greater than concrete itself. Use it when the crack needs to stop growing or the wall needs to carry structural load.
    • Polyurethane foam stops water. It expands to fill the crack and remains flexible, accommodating minor foundation movement without re-cracking. Use it primarily for waterproofing an active or wet crack.

    Epoxy Injection: What You Need to Know

    How It Works

    Two-part epoxy is injected at low pressure through surface ports drilled or glued along the crack. It penetrates hairline cracks down to 0.002 inches and cures rigid, creating a bond stronger than the surrounding concrete. Cure time is typically 24–48 hours.

    When to Use Epoxy

    • Dry or slightly damp cracks (no active water flow)
    • Structural cracks where wall integrity is a concern
    • Hairline cracks in poured concrete walls
    • Cracks in load-bearing concrete elements

    Epoxy Limitations

    • Cannot be injected into wet or actively leaking cracks — water prevents bonding
    • Rigid when cured — if the foundation continues to move, the crack will re-open adjacent to the epoxy
    • More expensive than polyurethane
    • Requires dry crack conditions

    Polyurethane Foam Injection: What You Need to Know

    How It Works

    Polyurethane reacts with water to expand up to 20–30 times its liquid volume, filling the crack completely and creating a flexible, waterproof seal. It can be injected into wet, actively leaking cracks. Cure time is 15–60 minutes depending on moisture level.

    When to Use Polyurethane

    • Active water leaks or seepage through a crack
    • Wet or damp cracks where epoxy won’t bond
    • Cracks in foundations with minor ongoing movement (settlement)
    • Cove joint repairs

    Polyurethane Limitations

    • Does not restore structural integrity
    • May need re-injection if crack re-opens significantly
    • Some foams become brittle over time and may shrink away from crack walls

    Side-by-Side Comparison

    FactorEpoxyPolyurethane
    Primary purposeStructural repairWaterproofing
    Works in wet cracksNoYes
    Flexibility when curedRigidFlexible
    Tensile strengthVery high (exceeds concrete)Low
    Cure time24–48 hours15–60 minutes
    DIY kit cost$150–$400$50–$200
    Best crack widthHairline to 1/4 inch1/16 inch to 3/4 inch

    DIY Injection Kit Options

    Several companies offer complete DIY crack injection systems with ports, epoxy or polyurethane, and an injection gun:

    • RadonSeal DIY Foundation Crack Repair Kit — polyurethane, good for active leaks, ~$75–$100
    • Emecole Metro Crack Repair System — offers both epoxy and polyurethane options, professional-grade, ~$150–$300
    • QUIKRETE Epoxy Concrete Repair — surface-only, not injection-grade, for cosmetic use only

    When to Call a Professional

    DIY injection works well for cracks under 10 feet long in poured concrete walls. Call a waterproofing contractor if:

    • The crack is horizontal (structural emergency)
    • The crack is wider than 3/4 inch
    • The crack spans more than half the wall height
    • Multiple cracks are present in the same wall
    • The wall is bowing or leaning inward

    For professional repair costs, see our guide to how much basement waterproofing costs in 2026. For a complete approach to keeping water out, explore our interior drainage solutions.