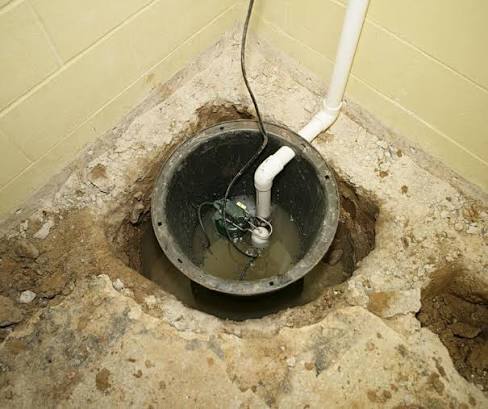
A sump pit (or sump basin) is the collection point for your basement waterproofing system. Without a properly sized, correctly installed pit, even the best sump pump will underperform. This guide covers how to install a sump pit yourself and what it costs to have a contractor do it.
What Is a Sump Pit?
A sump pit is a hole dug into the lowest point of your basement floor, typically 18–24 inches in diameter and 24–36 inches deep. It collects water that drains in through your interior perimeter drain or seeps up through the floor. The sump pump sits inside the pit and ejects water out through a discharge pipe.
Sump Pit Sizing Guide
| Basement Size | Pit Diameter | Pit Depth | Recommended Liner |
|---|---|---|---|
| Up to 800 sq ft | 18 inches | 24 inches | 18″ round plastic liner |
| 800–1,500 sq ft | 24 inches | 30 inches | 24″ round plastic liner |
| 1,500–2,500 sq ft | 24–30 inches | 30–36 inches | Large basin with drainage holes |
| Over 2,500 sq ft or high water | 30+ inches | 36+ inches | Contractor-installed concrete |
DIY Sump Pit Installation
Tools and Materials
- Rotary hammer drill with concrete chisel bit
- Jackhammer (rental: $50–$100/day) or sledgehammer
- Shovel and bucket for soil removal
- Plastic sump basin with pre-drilled holes ($30–$80)
- Gravel (pea gravel, 1/2 bag minimum)
- Concrete mix for patching around the basin
- Level
Step 1: Choose the Location
The sump pit must be at the lowest point in the basement, typically in a corner. It needs to be at least 8 inches from any wall to accommodate the basin and pump. Avoid placing it near electrical panels or water heaters. Check for underground utilities before digging.
Step 2: Break the Concrete
Use a rotary hammer or rented jackhammer to break through the concrete slab. Most basement slabs are 4 inches thick. Mark a circle 2–3 inches larger than your basin diameter to allow for gravel backfill and leveling. Remove concrete chunks and set aside.
Step 3: Dig the Hole
Dig down 6 inches deeper than your basin height to allow for a gravel base. The soil beneath most basements is dense and may require a digging bar. Remove soil and dispose of it — do not dump it near the foundation. Add 6 inches of pea gravel to the bottom of the hole.
Step 4: Set and Level the Basin
Lower the plastic basin into the hole. Check level in both directions. The top of the basin should sit flush with or slightly below the finished floor surface. Backfill around the basin with gravel, then compact lightly. Fill gravel holes in the basin sides if your basin didn’t come pre-drilled — drill 1/2-inch holes every 4–6 inches around the lower 2/3 of the basin.
Step 5: Pour Concrete and Finish
Mix concrete and pour it around the basin rim, feathering it smooth to meet the existing floor. Allow 24 hours to cure before setting the pump. Install a tight-fitting lid on the basin (required by many building codes and important for radon mitigation).
Contractor Costs for Sump Pit Installation
| Service | Cost Range | Notes |
|---|---|---|
| Sump pit only (no pump) | $300–$700 | Includes excavation, basin, concrete patching |
| Pit + submersible pump installation | $600–$1,500 | Most common installation |
| Pit + battery backup system | $900–$2,500 | Recommended for flood-prone areas |
| Full interior drainage + pit + pump | $4,000–$12,000 | Complete system installation |
Once your sump pit is installed, choosing the right pump is the next step. See our sump pump buyer’s guide for 2026 recommendations, or learn about interior drainage systems that feed into the pit.