Author: Leonel Vanegas

  • Curtain Drain vs. French Drain: What the Difference Is and Which Fits a Wet Basement

    Last updated: October 20, 2026. General information, not engineering advice. Local codes, soil and slope vary.

    Search for either name and you will find the two used almost interchangeably, and sometimes with different meanings. This guide sorts out what each term usually means, how a curtain drain works, and when a drain in the yard is the right tool for a wet basement and when it is not.

    The short answer

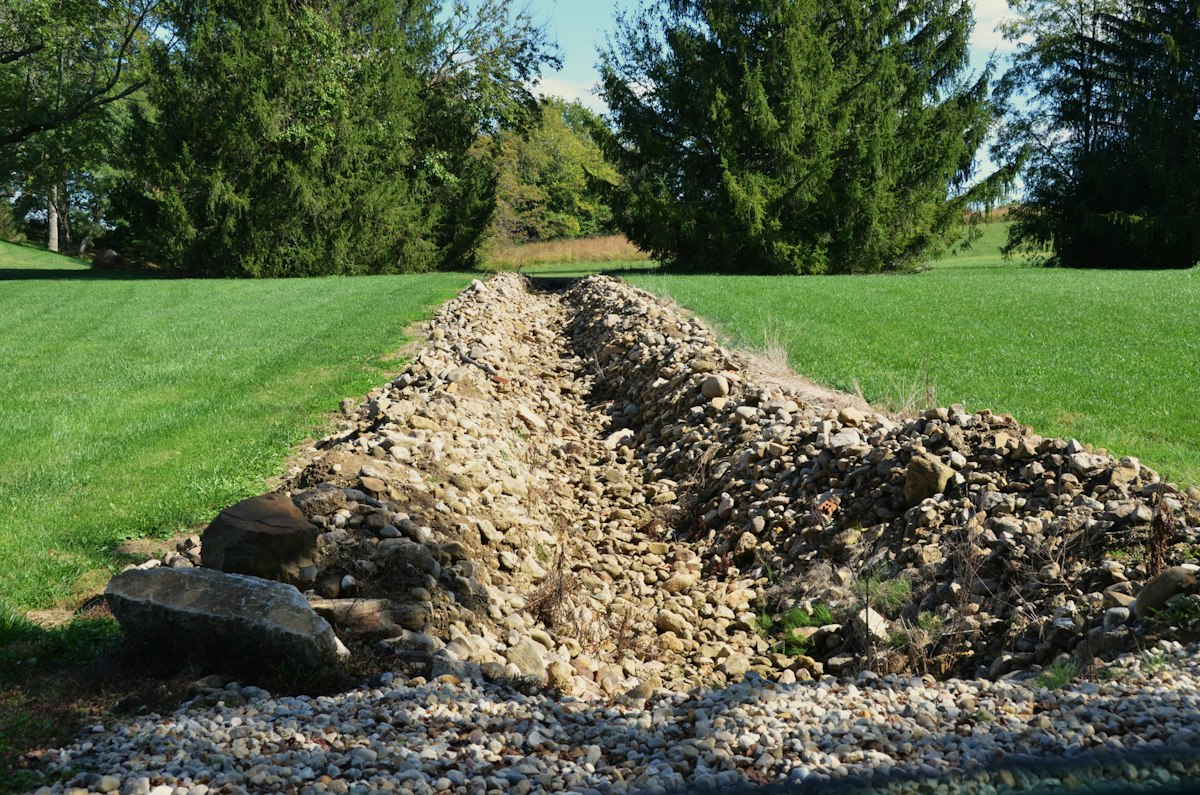
    A curtain drain is a type of French drain: a gravel-filled trench with a perforated pipe, placed between a source of water and the thing you want to keep dry, and sloped so the water runs off to a safe outlet. Fine Homebuilding describes the idea as intercepting surface runoff and groundwater before it reaches the foundation. A French drain is the broader family, and some sources (Angi, for one) use the name for deeper drains inside the basement as well. So the useful question is not “curtain or French?” but “where does this drain sit, and what water is it meant to catch?”

    A curtain drain is meant for runoff coming toward the house. It is not a fix for water rising through the floor from a high water table. Fine Homebuilding suggests an interior drain with a sump pump where the water table is high.
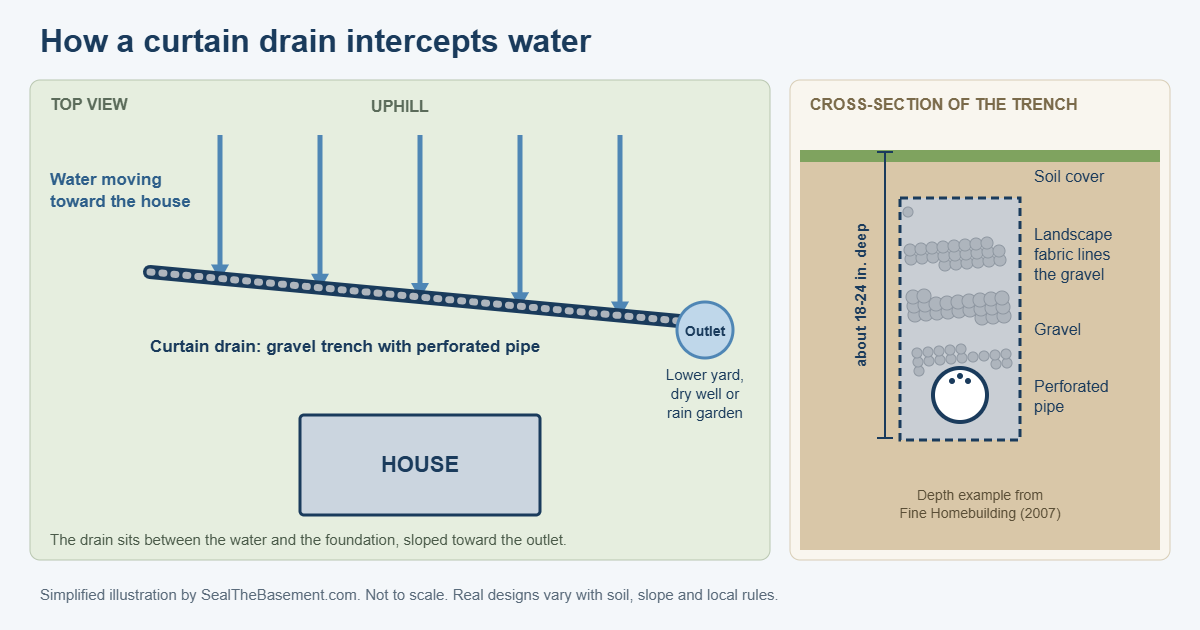
    Illustration with a top view showing a sloped curtain drain between uphill water and a house, ending at an outlet, and a cross-section of the trench with soil cover, fabric, gravel and perforated pipe
    Simplified illustration by SealTheBasement.com. The 18 to 24 inch depth is an example from Fine Homebuilding.

    Why the two names get mixed up

    The sources do not agree on vocabulary, which is a big reason homeowners get confused:

    SourceHow it uses the terms
    WikipediaA French drain is a trench of gravel or rock, with or without a perforated pipe, that redirects surface water and groundwater. A curtain drain is a version that is covered with soil so it stays hidden.
    InspectAPediaA French drain is an outdoor buried line that carries water away from a building. A footing drain sits outside the foundation wall at the footing. A perimeter drain is the one cut into the floor inside.
    Angi (updated Aug 4, 2026)A curtain drain is shallow and handles surface water. A French drain is deeper and is described mostly as an interior system for basements that flood from below.

    Angi and InspectAPedia therefore use “French drain” for different locations. When you get a quote, ask the contractor to say where the pipe goes (yard, footing or inside the basement) rather than relying on the name. Our guide to French drain costs covers the three kinds and their prices.

    How a curtain drain works

    • Position. It sits between the water source and the foundation, so water moving toward the house reaches the drain first.
    • Trench and fill. Fine Homebuilding describes a trench about 18 to 24 inches deep, with a perforated pipe, gravel over it, and landscape fabric (not cheap weed barrier) to keep silt out of the gravel.
    • Slope and outlet. The trench slopes downhill to an outlet where the water will not cause a new problem, such as a lower part of the yard, a dry well or a rain garden (the outlets Wikipedia lists for French drains in general).
    • Gutters stay separate. Fine Homebuilding advises not to connect gutter downspout lines to the perforated pipe, but to run them alongside it.

    That article dates from 2007, so read its dimensions as one example, not as a current standard.

    What a published specification looks like

    Numbers vary by purpose and place. As one example, Oregon’s septic rules (OAR 340-71-220) describe curtain drains that protect a drainfield from groundwater. A county guide summarizing them calls for a trench at least 12 inches wide, 4-inch perforated pipe with the holes facing up, at least 10 inches of drain media over the pipe, filter fabric on top, and a uniform pipe grade of 0.2 to 0.4 feet of fall per 100 feet. That rule is written for septic systems, not basements, but it shows how specific a properly designed curtain drain is. Wikipedia gives a typical pitch of 1 in 100 to 1 in 200 for French drains generally. Because the published figures differ, the right slope, depth and outlet for your lot are questions for a local contractor or designer.

    When a curtain drain may make sense

    • Water visibly runs toward the house from a slope, driveway or neighbor’s yard.
    • The yard has an obvious downhill spot where the water can leave by gravity.
    • Angi lists surface-level water, small volumes, sloped properties and clay soil as good fits for a curtain drain.
    • You have already fixed the cheap things: gutters, downspout extensions and grading. See our guide to exterior drainage for basements.

    When it is probably the wrong tool

    • Water comes up through the floor or the floor-wall joint. That often points to groundwater pressure, and an interior drain with a sump pump is what Fine Homebuilding suggests in that case; see interior vs. exterior waterproofing.
    • There is no place for the water to go. A curtain drain needs somewhere for the water to go by gravity. If the only outlet is uphill or too close to the house, the system has to pump the water, and that is a different design; see French drain vs. sump pump.
    • The foundation has a crack that leaks. A drain in the yard does not seal a crack. See crack injection.

    What it costs

    Angi puts curtain drains at $10 to $25 per linear foot and interior French drains at $40 to $100 per linear foot. Our French drain cost guide shows other published ranges, which differ by source. These are published estimates, not quotes, and trenching difficulty, access, outlet and local labor all move the price. A curtain drain is usually cheaper than an interior system, but only if it addresses your actual water source.

    Mistakes to avoid

    • Choosing by name. Ask where the pipe sits and what water it is meant to catch.
    • Skipping the filter fabric or using the wrong gravel, which invites clogging. Wikipedia names clogging as the main limitation of these drains.
    • Tying downspouts into the drain pipe, which Fine Homebuilding advises against.
    • Discharging onto a neighbor’s property or somewhere that causes new damage. Rules on discharge and permits vary locally, so check with your municipality first.
    • Digging without calling 811 first to locate buried utilities, as Fine Homebuilding also reminds readers.

    Questions to ask a contractor

    • Where exactly will the drain run, how deep, and how will it be sloped?
    • Where does the water leave, and is that allowed by local rules?
    • What fabric and gravel will be used, and how is clogging prevented?
    • Will gutter water be handled separately?
    • How would we know if it stopped working, and what does the warranty cover?

    Related guides

    How we put this guide together

    This guide was drafted with AI assistance and then edited for the site against the public sources listed below. We are not engineers or contractors, and we have not installed or inspected any drain. Definitions and construction details come from the sources below; cost figures come from Angi. Because the sources use the terms differently, we have said so rather than pick one. If you spot an error, use the contact page and we will correct it.
    Sources

  • French Drain vs. Sump Pump: How They Differ and How They Work Together

    Last updated: October 11, 2026. General information, not engineering advice. Local codes and soil conditions vary.

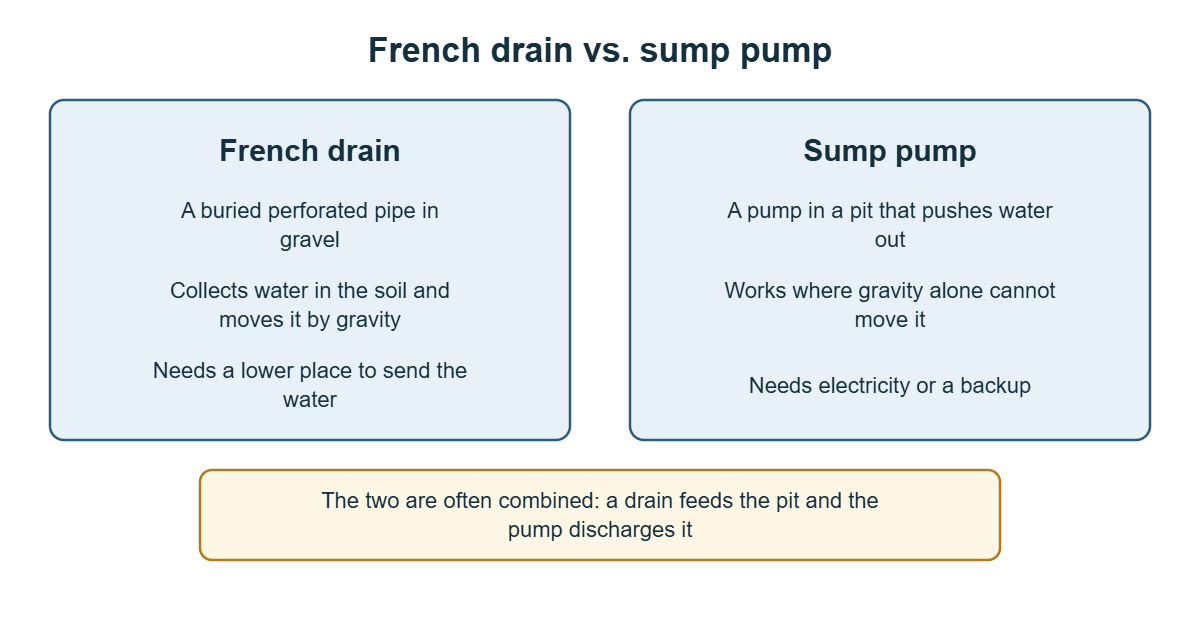
    These two get compared constantly, but they do different jobs. A French drain collects and carries water. A sump pump lifts water that cannot flow away on its own. In many basements you need both, working as one system. This guide explains how each works, what each costs and how to tell which problem you actually have.

    The short answer

    A drain moves water to a destination; a pump moves it up and out. LawnStarter notes a sump pump is needed when gravity alone cannot drain the water. Interior drains in a basement usually lead to a sump pit, which is why they are often sold together. Exterior drains can discharge by gravity to daylight if the yard slopes away. Neither works well if the surface water around the house is not managed first.

    Side-by-side diagram comparing a French drain, which moves water by gravity, with a sump pump, which pumps water out of a pit
    Simplified illustration by SealTheBasement.com.

    Side by side

    French drainSump pump
    What it isA gravel-filled trench with perforated pipeA pump in a pit that discharges water outside
    What it doesCollects water and carries it awayLifts collected water out of the pit
    Needs power?No, if it drains by gravityYes; backup advised
    Moving partsNonePump, float, check valve
    Typical costExterior $10 to $65 per foot; interior $40 to $100 per foot (LawnStarter)$1,200 to $2,500 installed (Bob Vila, This Old House)
    MaintenanceOccasional inspection of outletsRegular testing; see our maintenance checklist
    Fails whenPipe clogs with silt or has nowhere to drainPower fails, float sticks, pump wears out

    When a French drain alone may be enough

    • Water pools in the yard or against the house because of surface or shallow groundwater.
    • The yard slopes enough that the pipe can discharge by gravity to daylight.
    • You want a system with no moving parts that does not depend on power.

    When you need a sump pump

    • A basement interior drain collects water that has nowhere to flow by gravity.
    • Groundwater rises toward the floor level.
    • An exterior footing drain cannot reach daylight and must drain to a pit (Madison says the drains must lead to a sump).
    • You need to lift water out of the basement and away from the house.

    Why they are often used together

    Madison describes the interior system as a perforated pipe inside the footing perimeter that drains to a sump, and says exterior drain tile along the footing must also lead to a sump. This Old House notes pumps can fail during storms, so backup pumps and battery systems are worth considering. In practice, the drain provides the path and the pump provides the exit.

    Costs in context

    • LawnStarter: the average professionally installed French drain is about $5,000, with most projects from $1,650 to $12,250.
    • Fixr: interior perimeter drain at $40 to $120 per linear foot; sump pump $600 to $2,500.
    • Bob Vila: sump pump installation about $1,200 to $2,500, average near $1,500; concrete floor work $2,500 to $5,000.

    Our guides on French drain cost and sump pump installation cost break these numbers down.

    How to decide

    1. Check grading, gutters and downspouts first (Madison). Our exterior drainage guide covers the surface fixes.
    2. Work out where the water enters: through the wall, up through the floor or along the joint. See warning signs.
    3. Ask whether the water can drain by gravity to daylight. If yes, a drain may be enough. If not, you need a pit and pump.
    4. Get itemized quotes for the drain, the pit and the pump, and ask about backup power.
    5. Compare against exterior options in interior vs. exterior waterproofing.

    Mistakes to avoid

    • Buying a pump when the real problem is a downspout dumping at the wall.
    • Installing a drain with nowhere for the water to go.
    • Skipping the check valve, backup or cover. Madison says a sump needs an airtight cover.
    • Never testing the pump. See the sump pump maintenance checklist.

    Three scenarios

    • Damp yard, dry basement. Water pools outside after rain but the basement stays dry. A yard drain or regrading may be all that is needed, and a pump is probably not.
    • Water along the basement wall base during storms. An interior perimeter drain leading to a sump pit with a pump and battery backup is the usual pairing. See interior vs. exterior waterproofing for the alternative.
    • A pump already in place that runs constantly. Investigate where all that water comes from. Better gutters, grading or an added drain may reduce the load and extend the life of the pump.

    Can a French drain replace a sump pump?

    Only if the drain can discharge by gravity to a lower point and the water level will not rise above it. In a typical basement with the floor below the surrounding grade, interior drain tile has to lead to a pit, which means a pump. If you have a high water table or low-permeability soil, ask the contractor how the system handles rising groundwater. Madison notes that in low-permeability soil an interior system may not handle rising groundwater without a gravel layer under the slab.

    Questions to ask before you buy either

    • Where will the water discharge, and does it need to be pumped?
    • What happens during a power outage?
    • What maintenance does the system need, and who does it?
    • Is a permit needed? Madison, for example, requires one for sump pumps.
    • What does the warranty cover?

    Related guides

    How we put this guide together

    This guide was drafted with AI assistance and then edited for the site against the public sources listed below. We are not engineers or contractors. Cost figures come from LawnStarter, Fixr, Bob Vila and This Old House; the functional descriptions are drawn from Madison and LawnStarter. If you spot an error, use the contact page and we will correct it.
    Sources

  • Exterior Drainage for Basements: Surface Fixes, Yard Drains and Footing Drains

    Exterior Drainage for Basements: Surface Fixes, Yard Drains and Footing Drains

    Last updated: October 11, 2026. General information, not engineering advice. Local codes and soil conditions vary.

    “Exterior drainage” means any system that collects water outside the house and carries it away before it reaches the foundation. It ranges from a $20 downspout extension to an excavated footing drain. The sensible approach is to work from the cheapest, most surface-level fix down to the most invasive, and stop as soon as the problem is solved.

    The short answer

    Madison’s flooding guidance lists the order as grading and gutters first, then exterior drainage, then interior drainage. Exterior drainage is the most expensive option but also the most effective, according to the same source, because it intercepts water before it reaches the wall. It involves excavating around the foundation and installing drain tile along the footing, leading to a sump or to daylight.

    The layers of exterior drainage

    LayerWhat it doesTypical fix
    Roof waterKeeps rain from landing next to the wallClean gutters, extend downspouts (5 to 10 feet per Pro Builder)
    Surface gradeSends rain away across the soilRegrade to about 6 inches of fall over 10 feet
    Surface collectionCaptures water that poolsSwales or gravel-filled area drains piped away (Pro Builder)
    Shallow subsurfaceIntercepts water in the yardYard French drain; LawnStarter lists $10 to $65 per foot
    Footing drainDrains water at the base of the foundationExcavated drain tile along the footing, to a sump or daylight (Madison)

    Surface fixes

    Fixr lists gutters and downspouts at roughly $3 to $30 per linear foot, which is a small fraction of the cost of drain tile. If water is ponding near the house, a swale or an area drain may solve it without any digging near the foundation.

    Yard French drains

    A yard French drain is a trench filled with gravel and a perforated pipe, which collects water and carries it somewhere safe. LawnStarter puts exterior drains at $10 to $65 per linear foot, with shallow drains costing less than footing drains, which sit at least a foot deep. It also notes that soil type, access, pipe and gravel, permits and add-ons such as dry wells change the price. A yard drain helps when surface and shallow groundwater is the issue, and it needs a place to discharge. A shallow, soil-covered version placed between the water source and the house is often called a curtain drain; see curtain drain vs. French drain for how the terms differ.

    Footing drains

    A footing drain sits at the bottom of the foundation wall and carries away water that reaches the base. Installing one on an existing home usually means excavating to the footing, which is why it is the expensive end of exterior drainage. Madison describes the drain tile as backfilled with gravel or sand, or with a drainage mat and on-site soil, and says the drains must lead to a sump. Pro Builder lists letting dirt wash into footing drain gravel as a recurring mistake, so good backfill and filter fabric matter.

    Where the water goes

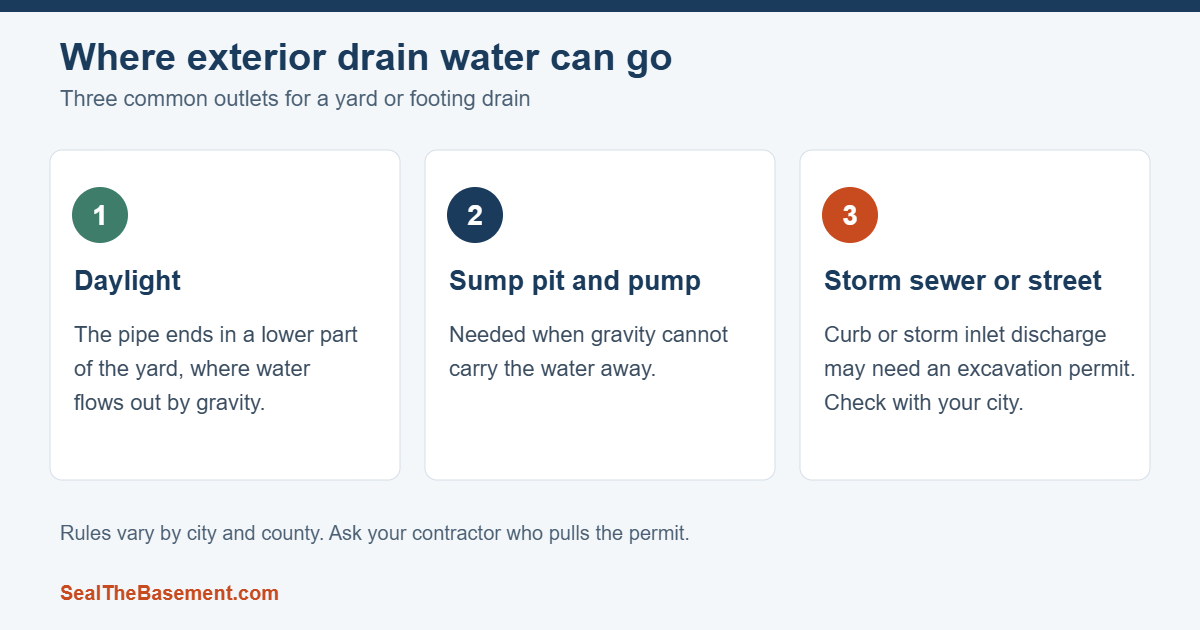
    • Daylight. The pipe ends in a lower part of the yard where water can flow out by gravity.
    • A sump pit and pump. Needed when gravity cannot carry the water away (LawnStarter). See our sump pump buyer’s guide.
    • Storm sewer or street. Madison notes curb or storm inlet discharges require an excavation permit and a pre-qualified contractor. Check local rules.
    Illustration of three outlets for exterior drain water: daylight, sump pit and pump, and storm sewer or street
    Simplified illustration by SealTheBasement.com.

    When exterior drainage is worth it

    • Water arrives at the foundation from the soil side despite good grading and gutters.
    • The wall itself is leaking and interior work would only collect the water after it passes through.
    • You are already excavating, or the foundation is exposed.
    • You plan to stay in the home a long time. This Old House recommends exterior work for persistent flooding and for homeowners planning to stay long-term, and mentions clay soils where hydrostatic pressure is a bigger issue.

    When to choose something else

    Exterior work is disruptive. This Old House says excavation-based work takes at least one to two weeks, compared with three to five days for interior drainage, and can mean tearing up patios, decks, driveways or irrigation. Interior drainage can be a better fit if the outside is inaccessible. Our interior vs. exterior guide weighs the two, and the French drain cost guide shows prices.

    What to ask a contractor

    • What is causing the water, and how did you confirm it?
    • What depth and length will the drain run, and where will it discharge?
    • What pipe, gravel and filter fabric are included, and how will you keep soil out of the gravel?
    • Is a permit required, and who pulls it? Does the quote include utility locating?
    • Does the price include restoring landscaping, concrete or sod?
    • What does the warranty cover?

    Compare at least three itemized quotes, and see how to hire a contractor for licensing and deposit rules that vary by state.

    A worked example: water pooling beside the house

    Suppose water collects along one side of the house after storms. First, fix gutters and extend downspouts, which are the cheapest steps. Then regrade so the soil falls about 6 inches over 10 feet. If it still pools, a 100-foot yard drain is in the range LawnStarter gives for exterior drains: $1,000 to $6,500, plus a permit that LawnStarter lists at about $58 to $225 where one is required. If water is entering the basement itself despite all that, you are in footing drain or interior drainage territory, which costs considerably more.

    Signs your exterior drainage is not working

    • Water pools next to the foundation or in the yard for a day or more after rain.
    • Soil washes out around downspouts, or mulch and gravel migrate toward the wall.
    • Damp or stained basement walls after storms.
    • A drain outlet that stays dry during heavy rain, which may mean the pipe is clogged or broken.
    • Settling soil along the foundation that creates a dip toward the house.

    Related guides

    How we put this guide together

    This guide was drafted with AI assistance and then edited for the site against the public sources listed below. We are not engineers or contractors. Costs come from LawnStarter, Fixr and This Old House and are national figures. If you spot an error, use the contact page and we will correct it.
    Sources

  • Exterior Foundation Waterproofing: What the Work Involves, What It Costs and When It Is Worth It

    Exterior Foundation Waterproofing: What the Work Involves, What It Costs and When It Is Worth It

    Last updated: October 20, 2026. General information, not engineering advice. Local codes and soil conditions vary.

    Exterior waterproofing is the most thorough way to deal with water at a foundation and the most disruptive and expensive. It is worth understanding what the work actually involves before you collect quotes, because the scope varies and the phrase “waterproofing” gets used for very different jobs.

    The short answer

    This Old House says nearly all exterior jobs involve digging around the foundation with heavy machinery, which may mean tearing up patios, decks, driveways or irrigation. It puts total costs for full exterior projects at about $7,000 or more, with a $7,000 to $15,000 range in its comparison table. Bob Vila gives a broader range of $1,000 to $15,000 for exterior sealing. Deeper foundations, difficult access and tight lots can push real quotes above those figures.

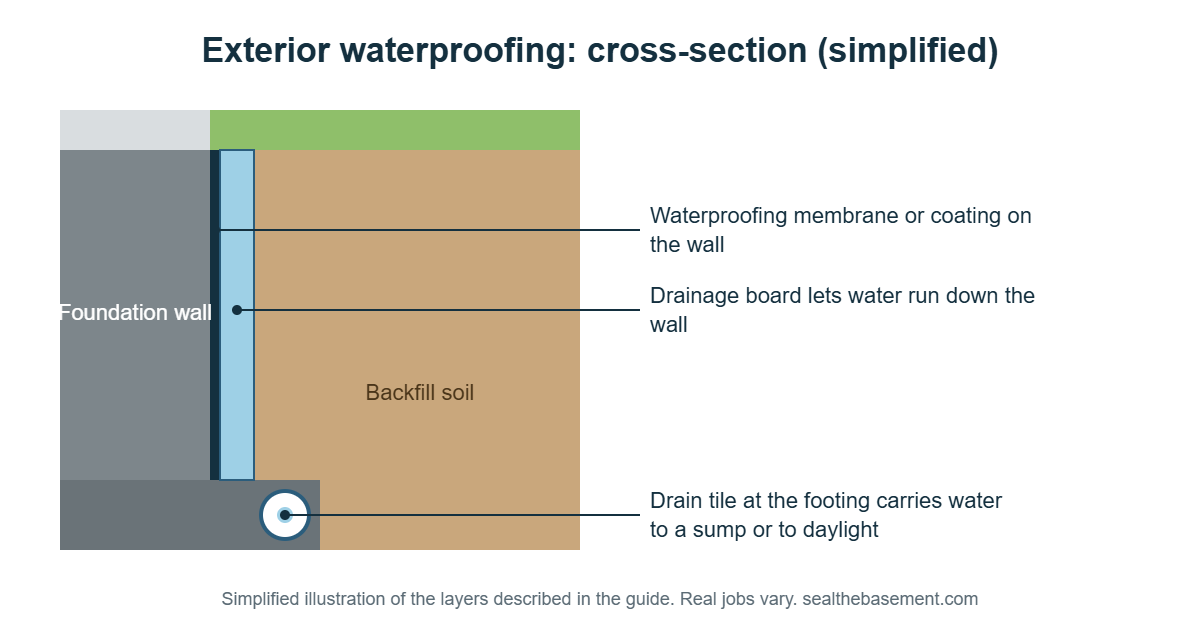
    Simplified cross-section of exterior foundation waterproofing showing membrane, drainage board, backfill and a drain tile at the footing
    Simplified illustration by SealTheBasement.com of the layers described below. Real jobs vary.

    What the process involves

    1. Locate utilities and get permits. Some cities require permits for excavation, typically $75 to $500 according to This Old House. Call 811 before digging.
    2. Excavate around the foundation, down to the footing in a full job.
    3. Clean and repair the wall, including cracks and any damaged surface.
    4. Apply a waterproofing membrane or coating. Fixr lists sodium bentonite waterproofing at about $2 to $5 per square foot as one option.
    5. Add drainage: drainage board and a drain tile or French drain that leads to a sump or daylight (Madison).
    6. Backfill and regrade. Pro Builder recommends free-draining fill without debris, placed in lifts and compacted, finished with a low-porosity cap such as clay sloped away from the house.
    7. Restore the surface: patios, steps, landscaping.

    Waterproofing vs. dampproofing

    The Building America foundation handbook from Oak Ridge National Laboratory distinguishes the two. Dampproofing coatings reduce vapor and capillary moisture but will not stop water under hydrostatic pressure. Waterproofing is recommended where drainage problems or hydrostatic pressure exist. When a quote says “waterproofing”, ask whether it is a true membrane with drainage or only a damp-proof coating. For new construction, Fine Homebuilding adds that the International Residential Code requires dampproofing (section R406.1), while waterproofing is for conditions such as a high water table.

    What it costs

    ItemPublished figureSource
    Full exterior projectAbout $7,000 or more; $7,000 to $15,000 in the comparison tableThis Old House (March 2026)
    Exterior sealing$1,000 to $15,000Bob Vila (June 2024)
    Excavation$50 to $200 per cubic yardThis Old House
    Exterior drainage (French drain)$10 to $100 per linear footThis Old House / Fixr
    Bentonite waterproofing$2 to $5 per square footFixr
    Excavation permit$75 to $500This Old House
    Interior plus exterior together$8,000 to $18,000 for a 1,000 sq ft basementThis Old House

    These are national figures, and they are lower than some marketing numbers you will see. Treat them as a sanity check rather than a ceiling, especially for deep foundations or sites where a deck, driveway or utilities complicate access.

    Types of exterior waterproofing products

    Quotes use the word “waterproofing” for very different materials. This breakdown follows Fine Homebuilding’s overview, which is written for builders:

    ProductWhat it isLimits the source notes
    Asphaltic coatingSprayed or brushed on; common and inexpensiveCounts as dampproofing; will not span cracks or resist hydrostatic pressure
    Dimple mat or drainage boardPlastic sheet whose dimples form an air gap that carries water down to the perimeter drainDimple mat can satisfy code dampproofing but is not a waterproofing layer by itself; drainage board with a geotextile cover usually protects a waterproofing layer
    Liquid-applied (rubberized) membraneSprayed, rolled or troweled on as a seamless coatingThickness depends heavily on the applicator
    Peel-and-stick sheet membraneCommon on residential sitesSome products need a primer
    Bentonite panelsClay that swells when wet to form a sealRepeated wetting and drying can reduce effectiveness
    Torch-applied membraneHeat-fused sheetNeeds skilled installers and can be dangerous

    Ask which of these a contractor is proposing, what protects it during backfill, and what drains the water once it reaches the wall. Fine Homebuilding also notes that a waterproofed wall alone is not enough: without a waterproofing layer under the slab, water can still be forced up through the floor.

    Red excavator digging soil in front of a house
    Stock photo by Chelaxy Designs on Unsplash. Illustrative only; not one of our projects.

    How long it takes and what it disrupts

    • This Old House says excavation-based work takes at least one to two weeks.
    • Expect equipment in the yard, torn-up landscaping and possible removal of patios, decks or steps.
    • Heavy equipment near the house and open trenches during rain are real hazards; ask how the crew manages them.

    When exterior waterproofing is worth considering

    • Persistent flooding that has not responded to grading, gutters or interior work.
    • You plan to stay long-term (This Old House).
    • Clay soils where hydrostatic pressure is higher (This Old House).
    • The wall is leaking from the soil side. This Old House argues that interior solutions only treat symptoms while exterior ones address the cause. Other sources point out interior systems manage water effectively, so the right choice depends on your situation. See interior vs. exterior waterproofing.
    • The foundation is exposed already, for example during an addition.

    Try the cheap fixes first

    Madison recommends grading and gutters before any below-ground drainage because they may solve the problem alone. See foundation grading and exterior drainage systems.

    Questions for exterior waterproofing quotes

    • What depth will you excavate to, and on how many sides?
    • What membrane or coating, and what drainage board and drain tile?
    • What backfill will you use, and how will it be compacted?
    • Where will the water discharge, and is a sump needed?
    • Who locates utilities, and who pulls the permit?
    • What restoration is included?
    • What does the warranty cover, and does it transfer?

    Get at least three itemized quotes. Our hiring guide and cost guide help you compare.

    Exterior or interior? A quick comparison by situation

    SituationOften a good fitWhy
    Water seeping through the wall from the soil sideExterior drainage and membraneStops water before it contacts the wall
    Water on the floor and at the wall base, yard cannot be dug upInterior drain and sumpCollects water inside; no excavation (see our interior vs. exterior guide)
    New addition or exposed foundationExterior waterproofing during the workThe wall is already open, so the incremental cost is lower
    Tight lot, deck or utilities against the wallInterior or targeted exterior workExcavation may be difficult

    Is this a DIY job?

    We do not recommend it, and none of the sources we used give homeowner instructions for it. The work means excavating down to the footing, working beside open trenches, locating buried utilities and installing a membrane correctly. Fine Homebuilding’s guide is written for professionals and says some membranes, particularly torch-applied ones, require skilled installers. The part a homeowner can reasonably start with is the surface side: gutters, downspout extensions and grading. See our guide to exterior drainage for basements.

    What can go wrong

    • Buried utilities. Always have them located before excavation.
    • Rain with an open trench. Ask how the crew handles weather and protects the open foundation.
    • Poor backfill. Pro Builder warns that debris-laden or high-porosity fill drains poorly, and that skipping compaction can lead to settling. It also notes aggressive compaction can bow walls, so ask how it will be done.
    • Dirt in the drain gravel. Pro Builder lists this as a recurring mistake; ask about filter fabric.
    • An incomplete scope. Check whether the quote covers the full perimeter, drain tile, membrane, backfill and restoration.

    How we put this guide together

    This guide was drafted with AI assistance and then edited for the site against the public sources listed below. We are not engineers or contractors. Costs come from This Old House, Bob Vila and Fixr. The process outline combines those sources with Madison and Pro Builder, and the product breakdown comes from Fine Homebuilding. If you spot an error, use the contact page and we will correct it.
    Sources

  • Sump Pump Not Working? A Step-by-Step Troubleshooting Guide

    Sump Pump Not Working? A Step-by-Step Troubleshooting Guide

    Last updated: October 11, 2026. General information. Your pump’s manual comes first, and anything involving electricity or plumbing repairs may need a licensed professional.

    When a sump pump stops working, the cause is often simple and fixable in minutes: no power, a stuck float, a clog or a backward check valve. This guide walks through those checks in order, then explains when to stop troubleshooting and call a plumber or electrician.

    Safety first

    • If the basement has standing water, do not step in until the power to the area is off. Call an electrician or your utility if you are unsure.
    • Unplug the pump before touching it or reaching into the pit (City of Ann Arbor).
    • Use gloves, since pit water can be dirty.

    The quick checklist

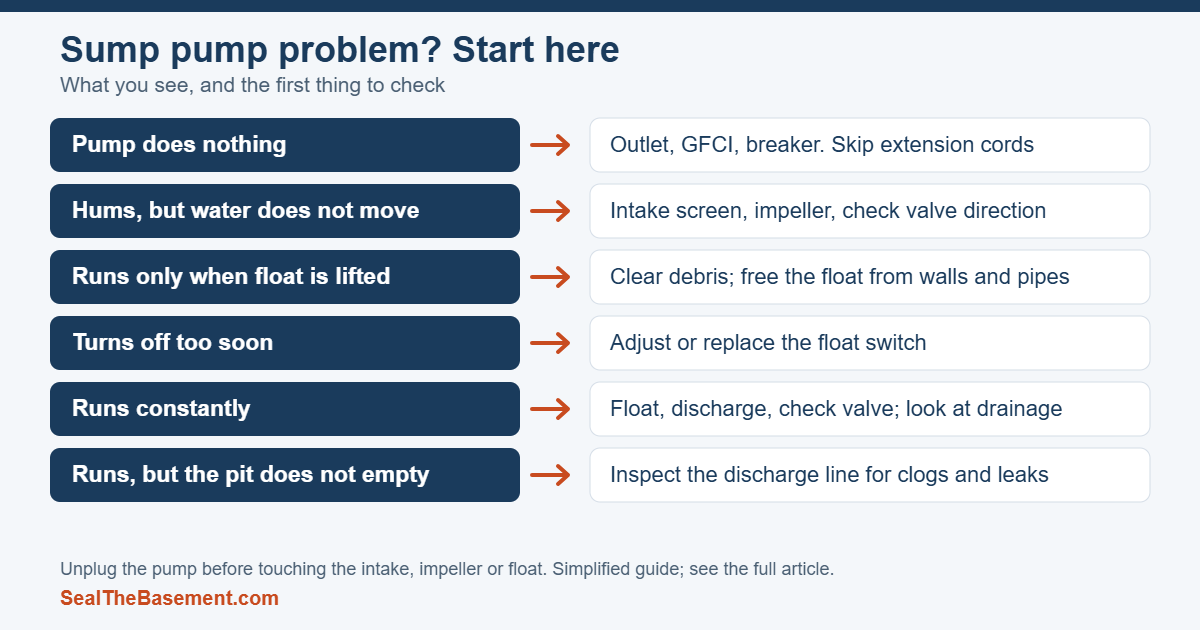
    Chart matching six sump pump symptoms to the first thing to check
    Simplified illustration by SealTheBasement.com. The table below has the likely causes.
    SymptomLikely causeWhat to check
    Pump does nothingNo powerOutlet, GFCI, breaker; plug directly into the wall instead of an extension cord
    Pump hums but water does not moveClogged intake or impeller; failed check valveUnplug, inspect intake screen and impeller; check valve direction
    Pump will not turn on by itself, but runs when the float is liftedFloat stuck or jammedClear debris; free the float from walls and pipes
    Pump turns off too soonFloat misadjusted or failingAdjust or replace the switch
    Pump runs constantlyFloat stuck, discharge problem, failed check valve, or a lot of incoming waterCheck float, discharge and check valve; see grading and drainage
    Pump runs but pit does not emptyBlocked or leaking discharge, backward check valveInspect the line for clogs and leaks

    Step 1: power

    Estes Services lists power problems first for good reason: the pump may be unplugged, the breaker may have tripped, or an extension cord may be causing trouble. Test the outlet with another device, press the GFCI test and reset buttons, and plug the pump directly into the wall (Farmers recommends this too). Low voltage can also overheat the motor, according to Estes, so a pump that shuts off repeatedly may need a dedicated circuit assessed by an electrician.

    Step 2: the float switch

    The float tells the pump when to start. If it is jammed by debris, caught on the pit wall or a pipe, or misadjusted, the pump may never start or may shut off early. Lift the float by hand. If the pump starts, the float was the problem. Clear anything that has fallen into the pit. If adjusting the float does not fix early shutoffs, Estes says the switch may need replacing.

    Step 3: clogs

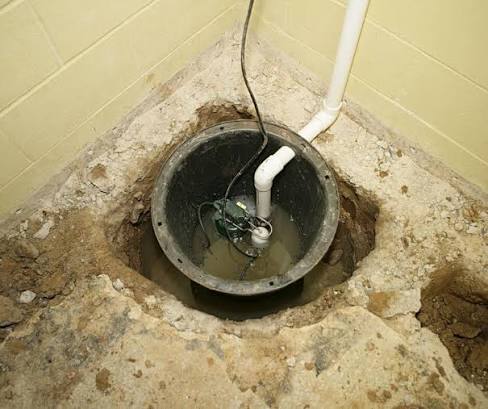
    Debris can block the impeller, the intake screen or the discharge line. Unplug the pump, lift it out if possible, and inspect the intake and impeller for debris and damaged blades (Estes). Ann Arbor says to remove silt, rocks and pipe fragments from the pit. Sand at the bottom is normal; heavy sediment points to a footing drain problem and calls for a contractor.

    Step 4: the check valve

    The check valve keeps water from flowing back into the pit. Estes says it can be installed backward or stuck closed, in which case the pump runs without moving water. Confirm the flow direction and that it opens freely. Ann Arbor also says the small weep hole above the pump should be open, because it prevents an airlock that makes the pump spin without pumping.

    Step 5: the discharge line

    Look over the line for clogs, cracks, loose joints and leaks that send water back into the basin. Farmers recommends checking it every 3 to 4 months and before winter for ice. Make sure the water ends up away from the foundation. Madison notes that if the discharge slopes back toward the house, water recirculates into the sump.

    Step 6: age and wear

    Estes and Farmers both say most sump pumps last roughly 7 to 10 years. Worn impeller blades reduce performance and call for an impeller replacement; if the motor is worn out, replacement is usually the better route. If the pump still will not run after these checks, it may have failed (Estes).

    What to do during a failure

    • Stay out of water near live electrical equipment.
    • If safe, bail water with buckets or a wet vacuum and move belongings off the floor.
    • Use a backup pump if you have one. Ann Arbor says to test it periodically so you know it works.
    • Call a licensed plumber for pump and plumbing repairs, or an electrician for power and battery backup issues (Farmers).
    • Photograph damage in case you file a claim. Farmers notes standard homeowners policies typically exclude water backup unless you add coverage.

    When it is not the pump

    A perfectly good pump can still be overwhelmed. If it runs constantly during storms and the basement still floods, the problem may be too much water arriving, an undersized pump, or a discharge issue. Look at grading, gutters and the drain system before replacing equipment. Our exterior drainage guide and interior vs. exterior waterproofing cover the options, and our sump pump maintenance checklist shows how to prevent repeat failures.

    Replacing a pump

    Bob Vila lists replacement as faster and cheaper than a first-time installation, taking about one hour, and puts submersible pumps alone at $100 to $400 and pedestal pumps at $60 to $170. Four Seasons lists installed prices of $1,200 to $3,000 for submersible and $800 to $1,500 for pedestal. See the cost guide for the full breakdown.

    Related guides

    How we put this guide together

    This guide was drafted with AI assistance and then edited for the site against the public sources listed below. We are not plumbers or electricians. Troubleshooting steps combine a city checklist, an insurer and a contractor page, which we flag because contractors benefit from repair calls. If you spot an error, use the contact page and we will correct it.
    Sources

  • How to Hire a Basement Waterproofing Contractor: What to Check Before You Sign

    How to Hire a Basement Waterproofing Contractor: What to Check Before You Sign

    Last updated: October 11, 2026. This guide is general information, not legal advice. Rules for contractors differ by state.

    Hiring a waterproofing contractor is usually a decision made under stress: there is water on the floor, a storm is in the forecast, and a salesperson is offering a fix that costs several thousand dollars. That combination is where homeowners overpay, sign contracts they do not understand, or hand over a large deposit to a company that never finishes the job. This guide walks through what to verify before you sign, what a good contract contains, how much of a deposit is reasonable in the states whose rules we checked, and which warning signs to take seriously.

    Start with the cause, not the contractor

    Before you compare companies, find out what is actually wrong. Water can come from surface runoff, a high water table, a failed window well, a leaking pipe or plain condensation, and each cause calls for a different fix. A contractor who quotes a complete drainage system after a quick look, without asking where and when the water appears, is selling a product rather than diagnosing a problem. Our guides on warning signs of a basement water problem and water seeping through walls after rain will help you describe the problem accurately and ask better questions. Also rule out the inexpensive fixes first, such as extending downspouts and correcting the grade near the foundation (see foundation grading).

    Verify the license or registration

    There is no single national license for waterproofing contractors, and the rules differ widely. The official guidance we reviewed shows how much:

    • Massachusetts tells homeowners to hire only contractors registered with its Home Improvement Contractor program, to ask to see the registration card and to check the contractor’s status and complaint history online (Massachusetts).
    • Virginia says to work with licensed contractors and to confirm that the license is active, and to check for past disciplinary actions, using the state license lookup (Virginia DPOR).
    • New York requires home-improvement contractors to be licensed or registered in New York City and in several counties and cities, so the check depends on where you live (New York Attorney General).

    Your state licensing board or attorney general’s office is the place to start. Ask for the license number in writing and look it up yourself rather than trusting a number printed on a business card.

    Ask for proof of insurance

    Ask for proof of liability insurance, which covers damage to your property during the work, and workers’ compensation insurance, which matters if someone is injured on your property. Massachusetts guidance specifically recommends asking for both (Massachusetts). Ask for the certificate to be sent to you directly by the insurance agent so you can confirm it is current. A verbal assurance is not proof.

    Get three written quotes and compare the scope

    Get at least three written estimates and ask why they differ rather than automatically choosing the lowest one. Virginia’s guide makes the same recommendation (Virginia DPOR). Two quotes with very different prices often describe very different jobs. Put them side by side and check:

    What to compareWhy it matters
    Interior or exterior work, and linear feet of drain or wall coveredA partial perimeter costs less but may leave the problem unsolved
    Sump pump make and model, and whether a battery backup is includedA pump that stops during a power outage cannot protect you during a storm
    Where the water is dischargedWater pumped next to the house can come back
    Who does the work: employees or subcontractorsAffects quality control and who is responsible if something goes wrong
    Permits, cleanup and floor or wall restorationSome quotes leave these out and add them later
    Warranty length, what it covers and whether it transfersSee our warranty guide

    Before you judge a price, compare it with the ranges in our basement waterproofing cost guide, which explains why published estimates disagree so much.

    What the written contract should include

    Never rely on a verbal promise. Requirements vary by state: New York requires a written contract for home-improvement work over $500 (New York Attorney General), Massachusetts for jobs over $1,000 (Massachusetts), and Virginia requires licensed contractors to provide a signed written contract for residential work (Virginia DPOR). Whatever your state requires, insist on a written contract that includes:

    • The contractor’s legal name, address, phone number and license or registration number.
    • A detailed description of the work and the materials, including brands and models.
    • The total price and a payment schedule.
    • Approximate start and completion dates.
    • The warranty terms, written out in full.
    • A notice of your right to cancel, where state law requires one.
    • No blank spaces. The New York guidance lists documents with blanks or incomplete sections as a warning sign.

    How big a deposit is reasonable?

    There is no national rule. The three states we checked handle deposits differently, which is exactly why you should check your own state before agreeing to a number.

    StateWhat the official guidance says
    MassachusettsDo not pay more than one-third of the estimated cost up front unless special-order materials are needed. Never pay in cash.
    VirginiaLimit the initial deposit to 10% of the contract or $1,000, whichever is less, and up to 30% for custom or special-order items. Tie later payments to completed work and do not pay in full until the job is finished.
    New YorkThe page gives no percentage cap. Contracts for prepaid funds must place them in an escrow account, and the contractor must tell you within five days where the money is held, or show bond insurance.

    Whatever your state, a payment schedule tied to completed stages is safer than a large payment before work starts, and the final payment should come after you have inspected the finished work.

    Protect yourself from liens

    A mechanic’s lien is a claim that contractors, subcontractors and material suppliers can place on a property if they are not paid. In some states, a subcontractor who was never paid can file a lien even if you paid the general contractor in full. The Minnesota Attorney General handbook explains how this works in Minnesota and recommends that homeowners list all expected subcontractors and suppliers in the contract and collect signed lien waivers from each before making the final payment. A lien waiver is a signed statement in which the subcontractor gives up the right to file a lien. Deadlines and notice rules vary by state, and if a lien is filed, the handbook advises speaking with an attorney.

    Red flags that should stop you

    The same warning signs appear across the New York, Massachusetts and Virginia guidance:

    • Unsolicited door-to-door offers, especially after a storm, or someone claiming to be “in the area” or to have leftover materials from another job.
    • Pressure to sign today, or a price that is “only good right now.”
    • A demand for full payment up front, for cash, or for payment by peer-to-peer apps such as Venmo.
    • Refusal to provide a license or registration number, proof of insurance or references.
    • A contract with blanks, or no written contract at all.
    • A request that you pull the permits yourself. Massachusetts advises making the contractor do it.
    • Out-of-area “storm chasers” who may be hard to find later if something goes wrong.
    Illustration of six contractor red flags: door-to-door offers, pressure to sign, full payment up front, no license or insurance proof, contract with blanks, asking you to pull permits
    Simplified illustration by SealTheBasement.com, based on the state consumer guidance cited above.

    Your right to cancel

    If a salesperson visits your home and you sign there, you may have the right to cancel. The FTC Cooling-Off Rule requires sellers to tell you about a three-business-day cancellation right for certain sales made at your home or other non-business locations, above a minimum amount and subject to exceptions. New York and Virginia also describe a three-day cancellation right in their guidance. In an emergency, New York lets you waive the right in writing, so read any waiver carefully before you sign it. Check the rule text (16 CFR Part 429) and your state attorney general’s office for the rules that apply to you.

    Questions to ask every contractor

    • What is causing my water problem, and can you show me the evidence?
    • What would happen if I fixed only part of the problem instead of installing the full system?
    • Who will do the work: your employees or subcontractors?
    • Can I speak with a customer whose job you completed at least five years ago?
    • Who is responsible for permits, and are they included in the price?
    • If I need a warranty repair and your company is gone, who honors the warranty?
    • Will you provide lien waivers from subcontractors and suppliers before my final payment?

    National chain or local company?

    Large national franchises and local independent contractors each have trade-offs, and we could not find reliable independent data on how their prices compare. A franchise may offer standardized systems and written warranties backed by a larger company. A local contractor may offer more flexible solutions and be easier to reach. The practical approach is to get at least one quote from each, ask both the same questions, and compare the written scope and the contract line by line. Judge each company on its license, insurance, references and contract, not on its size.

    When to schedule the estimates

    If your basement is not actively flooding, avoid signing in the middle of a crisis. Evaluations scheduled when the weather is dry give you time to compare quotes, and you may be able to watch how the basement behaves during the next rain before you commit. If water is entering right now, deal with safety first and make temporary arrangements, then take the time to compare contractors.

    Related guides

    How we put this guide together

    We read the consumer guidance published by the New York Attorney General, the Commonwealth of Massachusetts, the Virginia Department of Professional and Occupational Regulation and the Minnesota Attorney General, plus the FTC’s Cooling-Off Rule page, on October 11, 2026. We report what each source says and name the state next to each rule. We did not generalize one state’s rule to the whole country, and where a figure or rule is state-specific we say so. If you live elsewhere, your state attorney general or contractor licensing board is the authoritative source.

    Sources

    Want to see the published ranges added up for your own measurements? Try our basement waterproofing cost calculator.

  • Sump Pump Maintenance Checklist: How to Test, Clean and Prepare for Storm Season

    Sump Pump Maintenance Checklist: How to Test, Clean and Prepare for Storm Season

    Last updated: October 21, 2026. General information. Your pump’s manual comes first, and anything involving electricity or plumbing repairs may need a licensed professional.

    A sump pump does nothing for months and then has to work perfectly during the worst storm of the year. That is why many failures are not mysterious: the pump was unplugged, the float was stuck, the pit was full of silt, or the discharge was blocked. A short check a couple of times a year can catch many of them. This checklist combines guidance from a city, an insurer and a contractor’s page.

    How often to check

    TaskHow oftenSource
    Full inspection and testAt least twice a year, ideally before spring snowmeltCity of Ann Arbor
    Quick test with a bucket of waterEvery few monthsFarmers Insurance
    Clean the pump and pitTwice a yearFarmers Insurance
    Inspect the discharge lineEvery 3 to 4 months and before winterFarmers Insurance
    Check the battery backupPer manufacturer; keep it charged and replace on scheduleFarmers Insurance
    Backflow preventer inspection by a licensed plumberEvery 3 yearsCity of Ann Arbor

    Both sources say your manufacturer’s instructions take priority over general advice.

    Before you start: safety

    • Unplug the pump before any hands-on work, as Ann Arbor advises.
    • Test the GFCI protection on the outlet using its test button.
    • Plug the pump directly into a wall outlet rather than an extension cord (Farmers).
    • Do not work in a flooded basement with live electricity nearby. Call a professional.
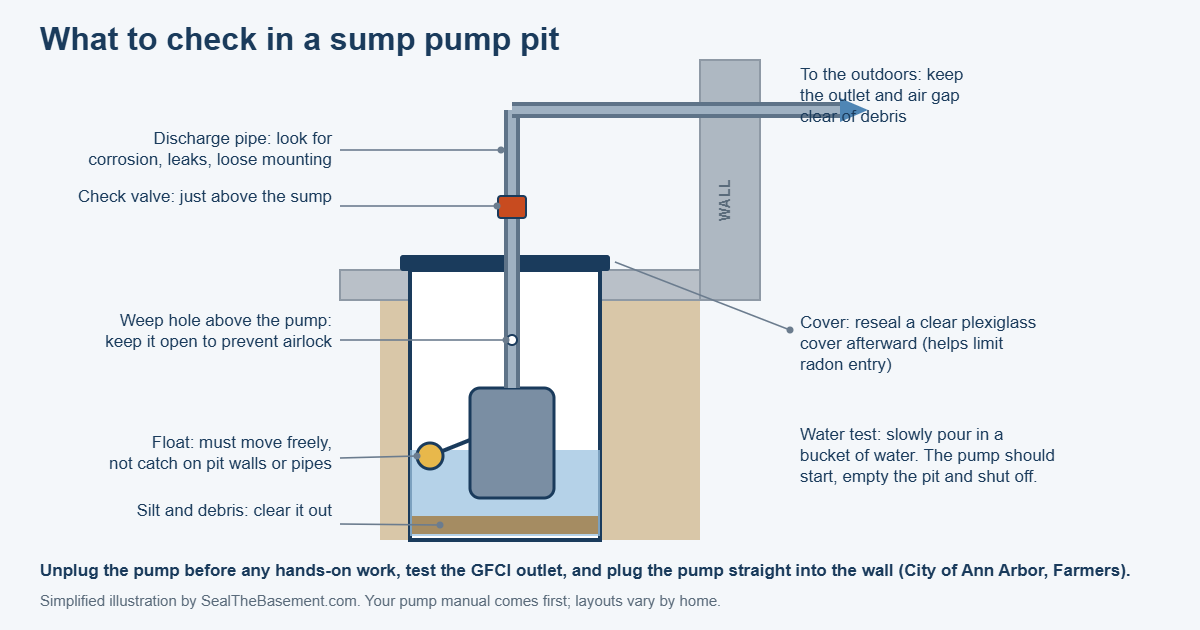
    Cross-section of a basement sump pump pit labeling the cover, discharge pipe, check valve, weep hole, float, pump and silt at the bottom, with the discharge line leading outdoors
    Simplified illustration by SealTheBasement.com, based on the checks described by the City of Ann Arbor and Farmers Insurance.

    The step-by-step test

    1. Check power. Confirm the outlet works and the GFCI is not tripped.
    2. Open the cover. Covers may be one piece, two pieces or clear plexiglass sealed to the floor. Clear covers have to be resealed afterward, which also helps limit radon entry (Ann Arbor).
    3. Clear the pit. Remove silt, rocks, mud and pipe fragments that could block the float or impeller. A little sand at the bottom is normal, but heavy sediment suggests a problem with the footing drain and calls for a qualified contractor (Ann Arbor).
    4. Check the float. It should move freely and not catch on the pit walls, pipes or other objects.
    5. Run the test. Slowly pour a bucket of water into the pit. The float should rise, the pump should start, water should leave through the discharge pipe, and the pump should shut off when the water drops (Farmers). Ann Arbor suggests adding a few gallons of water.
    6. Inspect the discharge pipe. Look for corrosion, holes, leaks and loose mounting. Make sure the small weep hole above the pump is open, since it prevents airlocks, and that the outdoor discharge point and air gap are clear of debris.
    7. Confirm there is a check valve on the discharge line just above the sump. If there is not one, Ann Arbor says a licensed plumber should add it.
    8. Finish up. Reconnect plugs, confirm breakers are on, and reseal any plexiglass cover.

    Cleaning the pump and pit

    Farmers recommends cleaning twice a year: unplug the pump, remove it if you can, clear dirt and sediment, wipe the exterior and clean the intake screen, then reinstall and restore power. If you find heavy sediment each time, that is a clue that something upstream, such as the drain system, needs attention.

    Battery backup and water-powered backup

    • Battery backup. Check the battery water level where applicable, confirm the backup activates only when the primary pump fails, and test the high-water alarm if you have one (Ann Arbor). Keep it charged and replace the battery on the manufacturer’s schedule, which Farmers says is often every few years.
    • Water-powered backup. Confirm the water supply valve is open and test that the backup runs (Ann Arbor).

    Backup power matters because storms often cause outages. For what backups cost, see our sump pump buyer’s guide.

    Warning signs to act on

    • The pump runs constantly or will not start.
    • Grinding, rattling or heavy vibration.
    • Rust or debris on the pump.
    • A musty or burnt smell.
    • Water in the pit that does not go down.

    Farmers recommends having the pump checked if any of these appear. Our troubleshooting guide covers common causes.

    How long pumps last

    Farmers and Estes Services both say many sump pumps last about 7 to 10 years, depending on how often they run and how well they are maintained. A pump that is older than that and runs frequently is a candidate for planned replacement before it fails, rather than during a storm. Our buyer’s guide explains what to look for.

    Insurance: check before you need it

    Farmers notes that standard homeowners insurance typically does not cover water backup damage unless you add water backup coverage, and that failures from normal wear and tear usually are not covered. Read your policy or ask your agent. This is general information, not coverage advice.

    A simple yearly calendar

    • Early spring (before snowmelt or heavy rain): full inspection, clean the pit and pump, test backup.
    • Mid-year: bucket test and discharge line check.
    • Fall (before freezing weather): inspect the discharge line for clogs, cracks and ice risk, clear the outdoor outlet.
    • Any time after a big storm or power outage: quick test.

    If the pump runs a lot

    A pump that cycles constantly is telling you a lot of water is arriving. Fixing grading and gutters is often a cheaper first step than replacing pumps, so see our exterior drainage guide, and compare solutions in French drain vs. sump pump.

    Keep a simple log

    Write the date and result of each test on a card taped near the pit, along with the pump model and the battery replacement date. If a problem develops, the history helps a plumber diagnose it quickly, and it shows you when a pump is approaching the 7 to 10 years that Farmers and Estes Services cite.

    How we put this guide together

    This guide was drafted with AI assistance and then edited for the site against the public sources listed below. We are not plumbers or electricians. Schedules are drawn from the City of Ann Arbor and Farmers Insurance; always defer to your manufacturer. If you spot an error, use the contact page and we will correct it.
    Sources

  • Interior vs. Exterior Basement Waterproofing: How to Choose

    Interior vs. Exterior Basement Waterproofing: How to Choose

    Last updated: October 11, 2026. This guide is general information, not engineering or legal advice. Prices are published national figures and will differ in your area.

    When water gets into a basement, contractors tend to push the system they sell. An interior drainage company will say outside excavation is overpriced. An excavation company will call interior drains a bandage. Both have a point, and neither tells you whether your house needs the work at all. This guide explains what each approach does, what published sources say it costs, and how to decide where to start.

    The short answer

    Interior drainage collects water that has already reached the wall or floor and sends it to a sump pit. Exterior waterproofing keeps water away from the wall by digging down to the footing and sealing and draining the outside. Exterior work usually costs more and is more disruptive. Neither is automatically the better choice. Which one fits depends on where the water comes from, and the cheapest fixes (grading and gutters) should come before either.

    How interior drainage works

    An interior system lives inside the basement. The slab is cut along the perimeter, a perforated pipe is laid in gravel, and the pipe drains to a sump pit where a pump sends water outside. The City of Madison describes it as a perforated pipe placed inside the footing perimeter that requires cutting out the edge of the slab and drains to a sump. For block walls, dimpled plastic sheeting at the base of the wall can help guide water to the pipe.

    • What it solves: water on the floor and at the base of walls, including water pushed up by groundwater.
    • What it does not do: it does not stop water from reaching the outside of the wall. Walls can still stay damp or show staining.
    • What it depends on: a working pump. A power outage during a storm is the classic failure, so a battery backup matters. See our cost guide for how sump pump prices compare.
    • A limit to know about: the Madison guidance notes that in low-permeability soil an interior system may not handle rising groundwater without a gravel layer under the slab.

    How exterior waterproofing works

    Exterior work means excavating around the foundation, down to the footing, then cleaning the wall, applying a waterproofing membrane, adding drainage board, and installing drain tile along the footing that leads to a sump or daylight. Backfill goes in last. Madison calls it the most expensive option and also the most effective. This Old House notes the excavation phase alone can take one to two weeks.

    • What it solves: water working through the wall from the soil side, and failed or missing exterior drainage.
    • What it costs you besides money: landscaping, patios, steps or decks next to the house may have to be removed and rebuilt.
    • What it may not solve: water coming up through the floor from a high water table, because that water never touches the outside of the wall.

    What the published sources say it costs

    Published prices for this work disagree, partly because they average different jobs. These are the ranges from the sources we reviewed.

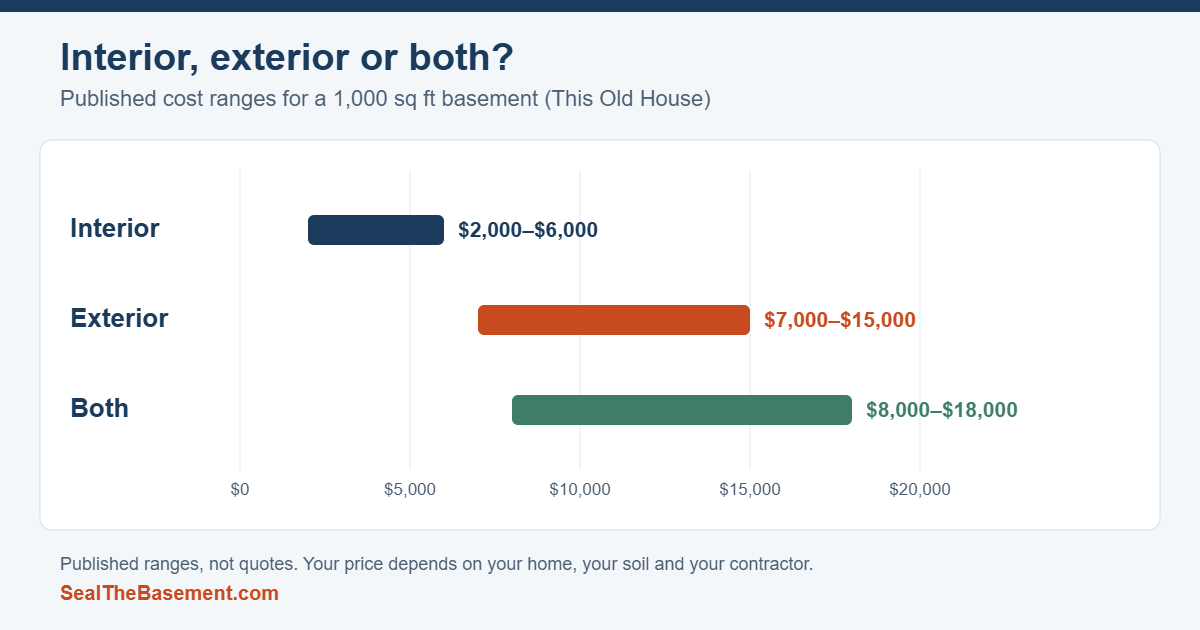
    Bar chart of published cost ranges for interior, exterior and combined basement waterproofing on a 1,000 square foot basement
    Simplified illustration by SealTheBasement.com. Ranges are those published by This Old House for a 1,000 sq ft basement; they are not quotes.
    SourceInteriorExteriorNotes
    This Old House (updated March 2026)About $3,000 average; $2,000–$6,000 in its summary tableAbout $7,000 average; $7,000–$15,000 in its tableBased on a 1,000 sq ft basement. Interior plus exterior together: $8,000–$18,000. Sump pump installed: $1,200–$2,500.
    Fixr (updated February 2026)Interior perimeter drain: $40–$120 per linear footFrench drain: $10–$100 per linear footTotal basement waterproofing about $5,000 ($3,000–$10,000). Sump pump $600–$2,500. Permits $75–$500 extra.
    Bob Vila (last updated June 2024)$200–$3,000 (sealing)$1,000–$15,000 (sealing)National average given as $4,920. Says exterior work may be the only option with a high water table.

    Notice that these figures are far below some numbers you may see in contractor marketing. They are national averages for typical jobs. A deep foundation, a house with a deck or driveway against the wall, or a tight lot can push a real quote above them, so treat the table as a sanity check rather than a ceiling.

    Why quotes for the same house can differ so much

    Per-foot pricing explains a lot of the spread. A basement about 30 by 33 feet has roughly 126 feet of perimeter. At the $40–$120 per linear foot range Fixr lists for an interior perimeter drain, that is about $5,000 to $15,000 for the drain alone, which is well above This Old House’s $2,000–$6,000 summary range. Neither source is necessarily wrong. They are describing different scopes.

    That is why you should ask every contractor for an itemized quote that shows linear feet of drain, sump pump model, battery backup, discharge line, and permit fees. If you need help comparing, our guide on how to hire a basement waterproofing contractor explains how to line quotes up.

    Start with the cheap fixes first

    Madison’s flooding guidance puts it plainly: many water problems can be solved above ground, and grading and gutters should come before any below-ground drainage because they may fix the problem alone. That means downspout extensions that carry water away from the house and soil sloped away from the foundation. Even if you end up needing a drain system, moving water away at the surface reduces the load on it. Our exterior drainage guide covers these surface fixes.

    When interior drainage is the sensible choice

    • Water appears at the base of walls or on the floor after heavy rain, and the surface drainage is already good.
    • You cannot or do not want to dig up the yard, or there are structures, utilities or tight property lines outside.
    • The cost of exterior excavation would be out of proportion to the problem.
    • You want a system that can be installed in a few days, regardless of season.

    When exterior waterproofing deserves a serious look

    • The wall itself is leaking from the soil side and the exterior drainage has clearly failed.
    • You are building new or already have the foundation exposed. Doing it before backfill is far cheaper than digging later.
    • A contractor or engineer finds damage that needs repair from the outside, such as deteriorating wall surfaces.
    • Interior work has been done and the wall problem persists.

    If you see bowing walls or large, growing cracks, hire a licensed structural engineer before choosing a waterproofing system. Waterproofing does not fix a structural problem.

    A quick way to match the problem to a starting point

    What you seeLikely starting point
    Damp spots after rain, downspouts dump near the houseFix gutters, downspouts and grading first
    Water on the floor at the wall baseInterior drain and sump, after checking grading
    Water coming through the wall itselfExterior drainage or membrane, or a professional assessment
    Water rising from the floor with heavy rainInterior drain and sump; exterior work alone will not stop it
    Bowing walls, wide or growing cracksStructural engineer before any waterproofing decision

    This table is a starting point for questions, not a diagnosis. Our guides on warning signs of basement water problems and water seeping through walls after rain can help you describe what you are seeing to a contractor.

    Paint, sealers and dampproofing are not waterproofing

    Some quotes include waterproof paint or sealer, which Fixr prices at roughly $1 to $8 per square foot. These can help with humidity, but they are not designed to hold back water under pressure. The Building America foundation handbook from Oak Ridge National Laboratory makes the same distinction: dampproofing reduces moisture but will not stop water under hydrostatic pressure, while waterproofing is recommended where rain, irrigation or snowmelt can create that pressure. If a contractor offers a coating alone for an active leak, ask what happens when the water pressure builds.

    Questions to ask before you choose

    • What is causing the water here, and how did you determine that?
    • Have grading and gutters been checked and fixed first?
    • Is the quote itemized by linear foot, pump, backup power and discharge?
    • What does the warranty cover, and is it transferable?
    • Is a permit required, and who pulls it? Madison, for one, requires a building permit for sump pumps.
    • Is it written into the contract, and does it list the work and the warranty?

    Related guides

    How we put this guide together

    This guide was drafted with AI assistance and then reviewed and edited by Leonel Vanegas, the site editor, against the public sources listed below. We are not contractors or engineers. Prices come from the cited pages as of their stated update dates and are not quotes. If you find an error, use the contact page and we will correct it.

    Sources

  • Basement Wall Crack Injection: Epoxy vs. Polyurethane and What It Costs

    Basement Wall Crack Injection: Epoxy vs. Polyurethane and What It Costs

    Last updated: October 11, 2026. General information, not engineering advice. A crack that is growing, bowing or leaking heavily needs a professional assessment.

    Crack injection is the professional alternative to patching: a technician fills a foundation crack from the inside with a liquid that cures in place. The two common materials are epoxy and polyurethane. Which one is appropriate depends on whether the crack is dry or wet, and whether it is still moving, and neither one fixes the reason the crack formed.

    The short answer

    Bob Vila describes epoxy injection as a method for stable cracks, such as those left after an earthquake or impact once movement has stopped, and polyurethane injection as an option for cracks that stay damp and cannot be dried. This Old House refers to epoxy or polyurethane foam as ways to seal cracks flexibly. In both cases, a professional should assess whether the crack is structural before choosing a material.

    Close-up of a gray concrete surface with fine hairline cracks
    Stock photo by Yura Batiushyn on Unsplash. Illustrative only; not one of our projects.

    Epoxy vs. polyurethane, in plain terms

    Epoxy injectionPolyurethane injection
    Typical use (per Bob Vila)Cracks that have stopped moving; two-part pressurized epoxy injected through portsCracks that stay wet and cannot be dried
    Who does itA contractorA professional, similar to epoxy injection
    Good question to askHas the crack stopped moving? How do you know?Why is the crack wet, and where is the water coming from?
    What it does not doDoes not address water pressure or soil movement behind the wallDoes not address water pressure or soil movement behind the wall

    We are deliberately not giving a head-to-head strength or lifespan comparison, because the sources we reviewed do not provide one. Ask any contractor you hire to explain, in writing, why they chose their material for your specific crack.

    Why foundations crack in the first place

    This Old House explains that hairline cracks often come from concrete curing and shrinking, especially in the first couple of years. Vertical cracks are usually settling as the house adjusts. Diagonal and horizontal cracks tend to point to differential movement or soil and water pressure against the wall. Injection fills the gap. It does not change the forces that opened it, which is why identifying the cause comes before choosing a material.

    What injection can and cannot do

    • It can seal a crack against water and, with the right material and conditions, bond a stable crack.
    • It cannot stop a wall that is still moving, relieve soil pressure, or correct poor drainage outside.
    • It may not prevent water from finding another route if the underlying water source is unchanged.

    First, work out what kind of crack you have

    • Cosmetic or hairline. Thin cracks from curing and shrinkage. Often not worth injecting.
    • Serviceable. Cracks that show some stress and can admit pests or moisture. Not all need repair (Bob Vila).
    • Structural. The rarest type, according to Bob Vila, and one that can compromise the house and must be fixed.
    • Leaking. Seal the crack and handle the water source. Bob Vila recommends diverting water by removing plantings, adding gutters and downspouts, and sloping soil at least 2 percent away from the house.

    This Old House explains that horizontal cracks are the most concerning, often tied to soil pressure or water pushing the wall inward, and that diagonal cracks can indicate parts of the foundation moving differently. These deserve an engineer’s opinion before any injection. Our hydraulic cement guide includes a triage table.

    Signs you need an engineer first

    • Cracks that grow, spread or appear suddenly.
    • Horizontal or diagonal cracks together with other movement signs.
    • Doors or windows that suddenly stick, or gaps that keep growing.
    • Cracks wider than about 1/4 inch, or uneven floors or leaning walls.
    • Water entering through the foundation.
    • You are buying a home with foundation cracks. This Old House advises a structural engineer’s inspection before deciding.

    What injection costs

    Published sources give total repair ranges, not a reliable per-foot injection price. This Old House lists foundation crack repair from about $2,224 to about $8,134, with an average near $5,179, depending on the extent of movement, the cause and the repair type. Bob Vila gives a broader span, from under $50 for a hairline crack to more than $8,000 for a serious fix. Get at least three written quotes and ask each contractor to itemize the materials, number of cracks, length and any related drainage work. Our hiring guide explains how to verify licensing and compare bids.

    Questions to ask a contractor

    • Is this crack structural, leaking or cosmetic, and how did you decide?
    • Why epoxy or why polyurethane for this crack?
    • Has movement stopped? Will you monitor it?
    • What will you do about the water source?
    • What does the warranty cover and for how long?
    • If the crack reopens, what happens?

    DIY kits and their limits

    Retail crack kits exist, and Bob Vila mentions that a DIY concrete crack repair kit can work for wider cracks, but also advises a professional inspection first in case the crack has a serious cause. If the crack is wet, wide, horizontal or growing, skip the kit and get it assessed. A DIY fix that hides a symptom can delay finding a real problem.

    After the repair

    • Mark the ends of the crack with a pencil and the date, then check it periodically.
    • Fix grading, gutters and downspouts so less water reaches the wall. See our exterior drainage guide.
    • Watch humidity in the basement. See basement humidity levels.
    • If water appears again nearby, the system needs drainage, not just another injection. See our cost guide.

    Related guides

    How we put this guide together

    This guide was drafted with AI assistance and then edited for the site against the public sources listed below. We are not engineers or contractors. The material comparison is limited to what Bob Vila and This Old House state; we do not make claims about product strength or lifespan. If you spot an error, use the contact page and we will correct it.

    Sources

  • Hydraulic Cement for Basement Cracks: When It Works and When It Does Not

    Hydraulic Cement for Basement Cracks: When It Works and When It Does Not

    Last updated: October 21, 2026. General information, not engineering advice. A crack that is growing, bowing or leaking heavily needs a professional assessment.

    Hydraulic cement is the fast-setting patch you can buy at a hardware store to stop a small leak in a basement wall. It can work very well on the right problem and do nothing useful on the wrong one. This guide explains when it is the right tool, how to apply it, and how to tell when a crack needs more than a patch.

    The short answer

    According to This Old House, hydraulic cement is useful for sealing cracks in concrete walls or floors, patching holes around pipes, stopping active leaks, and repairing worn mortar joints in masonry. It is water-activated, so it can set in wet conditions, and it expands slightly as it cures. But it stops a leak at one spot. It does not repair underlying damage or the cause of the leak.

    When hydraulic cement is a good fit

    • A small, stable crack that is seeping water.
    • A hole around a pipe or a gap where something passes through the wall.
    • Worn mortar joints in a masonry wall.
    • A quick repair while you work out where the water is coming from and plan the permanent fix.

    When it is the wrong tool

    • Cracks that are still moving. A rigid patch will crack again. This Old House notes hydraulic cement is not suited to expansion joints, which are designed to move and need more flexible sealants.
    • Structural cracks or wide gaps. The same source says these may need a professional.
    • Horizontal cracks and bowing walls. Bob Vila says horizontal cracks are usually caused by hydrostatic pressure and should be looked at by an engineer or foundation professional.
    • Widespread dampness. If water is coming through the wall in many places, patching individual spots misses the point.

    Triage: how serious is the crack?

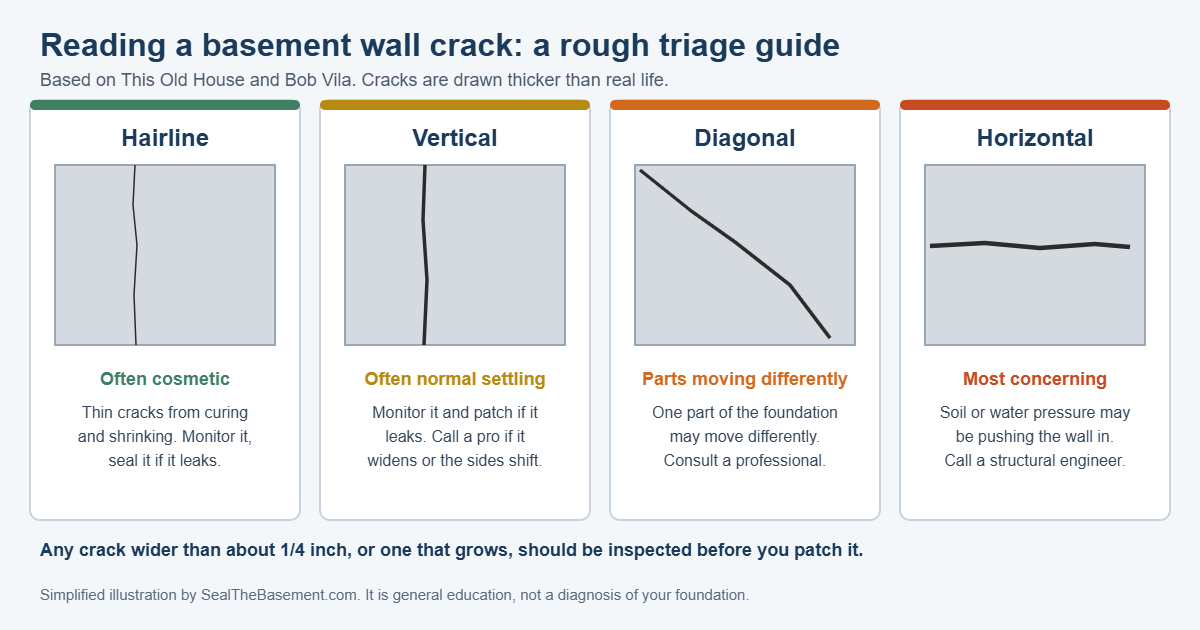
    Four wall panels showing hairline, vertical, diagonal and horizontal cracks, ranked from often cosmetic to most concerning, with a note on what each may mean
    Simplified illustration by SealTheBasement.com, following the crack types in the table below.
    CrackWhat it may meanReasonable next step
    HairlineThin surface cracks from curing and shrinking; often cosmetic (This Old House)Monitor; seal if it leaks
    VerticalOften normal settling (This Old House)Monitor; patch if it leaks; call a pro if it widens or shows displacement
    DiagonalOne part of the foundation moving differently from another (This Old House)Look for sticking doors and sloping floors; consult a professional
    HorizontalThe most concerning type; soil pressure or water pushing the wall in (This Old House)Call a structural engineer
    Wider than about 1/4 inchMay be harmless, but should be inspected (Bob Vila)Have it inspected before patching

    What you need

    • Hydraulic cement
    • A mixing bucket and a small trowel
    • A hammer and chisel, and a wire brush
    • Clean water
    • Gloves and safety glasses, since the cement can irritate skin

    How to apply it

    These steps follow This Old House’s instructions.

    1. Open and clean the crack. Chip away loose concrete or mortar with a chisel and hammer. Brush out dust and debris with a wire brush. On smooth surfaces, roughen the spot so the cement has something to grip.
    2. Dampen the area with clean water just before applying.
    3. Mix a small batch to a thick, paste-like consistency, which Tom Silva compares to peanut butter. It sets fast, sometimes in under five minutes, so mix only what you can use in two to three minutes.
    4. Press it in. Wearing gloves, pack the cement firmly into the crack, gap or pipe opening.
    5. Shape and smooth the surface before it sets. A wet brush can feather the edges.
    6. Keep it damp. Mist the repair periodically for about 24 hours while it cures.

    Common mistakes

    • Mixing too much at once. The cement sets before you can use it.
    • Skipping the cleanup. Cement does not bond well to loose or dusty material.
    • Patching a crack that is still moving.
    • Treating the patch as a cure. If the water source remains, a new leak can appear next to the repair.
    • Ignoring signs such as sticking doors, sloping floors or bulging walls. Bob Vila lists these as reasons to involve an engineer.

    Other patch materials for dry cracks

    Hydraulic cement is built for wet conditions. For dry, stable cracks, Bob Vila describes simpler options: grout for hairline cracks up to about 1/8 inch, and concrete-compatible caulk for cracks between about 1/8 and 1/4 inch, which keeps out moisture, soil odors and radon. If the crack is not wet, one of those may be a better match. If you are unsure which applies, a quick inspection by a foundation professional may save you a repair that fails.

    Check the repair over the next few weeks

    A good patch stays dry after heavy rain. Check it after the next few storms. If damp spots appear around the edge of the patch, the water is finding another path, and the cause needs attention. Mark the ends of any crack with a pencil and date so you can see whether it is growing.

    Fix the water, not just the crack

    Bob Vila’s guidance for leaking cracks is to seal the crack and divert the water: remove plantings against the foundation, add gutters and downspouts, and grade the soil to slope at least 2 percent away from the house. See our guide on exterior drainage. If water keeps returning after you have done that, compare drainage approaches in interior vs. exterior waterproofing.

    What professional crack repair costs

    This Old House lists foundation crack repair at about $2,224 at the low end, an average of about $5,179 and about $8,134 at the high end, depending on whether the crack is cosmetic or structural and what is causing it. Bob Vila gives a range from under $50 for a hairline crack to more than $8,000 for a serious fix. A hydraulic cement patch, by contrast, is a small materials cost. For when professional methods make sense, see our guide on crack injection with epoxy or polyurethane.

    When to call a professional

    • Horizontal or stair-step cracks, or cracks wider than about 1/4 inch.
    • Bulging walls. Bob Vila suggests checking with a long straightedge.
    • Cracks that grow, spread or appear suddenly (This Old House).
    • Doors or windows that stick, sloping floors, or walls separating from the floor.
    • Water that keeps coming back after repairs. See how to hire a contractor.

    How we put this guide together

    This guide was drafted with AI assistance and then edited for the site against the public sources listed below. We are not engineers or contractors. The application steps follow This Old House; crack triage combines This Old House and Bob Vila. If you spot an error, use the contact page and we will correct it.
    Sources