Author: Leonel Vanegas

  • How Much Does Basement Waterproofing Cost? 2026 Price Guide

    How Much Does Basement Waterproofing Cost? 2026 Price Guide

    Last updated: October 11, 2026.

    There is no single price for waterproofing a basement. A sealed crack can cost a few hundred dollars, while a full exterior excavation can pass $20,000. The published estimates also disagree with each other, sometimes by a lot. This guide shows what two widely read cost guides report, explains why their numbers differ, and tells you what to check in a quote so you can compare contractors on the same terms.

    Quick answer

    Budget by the size of the problem, not by an average. Small, single fixes (one crack, one sump pump, sealant on a damp wall) are typically in the hundreds to low thousands of dollars. Whole-basement drainage systems and exterior excavation are typically in the tens of thousands. Both sources below report a top end of about $20,000 or more for full exterior work.

    What the published guides report

    We compared two guides: This Old House (updated March 2026, using data from Homewyse and Angi plus its own analysis of quotes) and Modernize (no update date shown). Figures are copied as the sources state them.
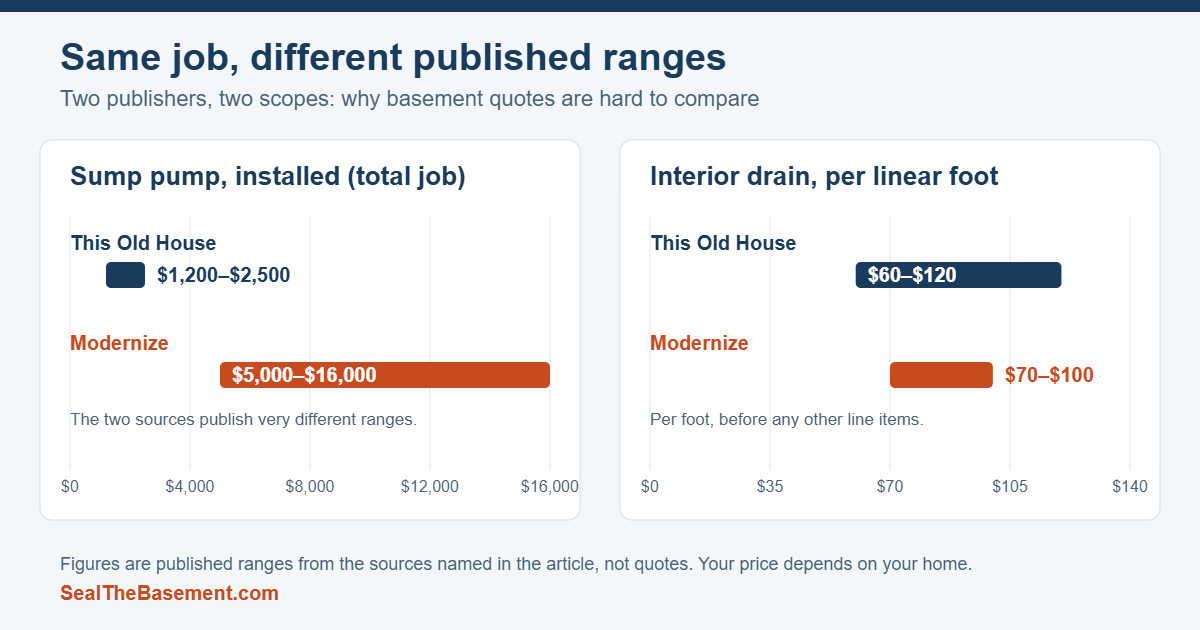
    Bar chart comparing published cost ranges from This Old House and Modernize for sump pump installation and interior drains per linear foot
    Simplified illustration by SealTheBasement.com. Ranges are those published by the sources named in this article; they are not quotes.
    WorkThis Old HouseModernize
    Interior drain tile / interior French drain$60–$120 per linear foot (a separate section lists $25–$55)$70–$100 per linear foot
    Sump pump installation$1,200–$2,500, professionally installed$5,000–$16,000 (interior sump pump with installation)
    Exterior French drain$10–$100 per linear foot (French drains in general)About $25 per linear foot, or $8,000–$15,000 for a full property
    Exterior waterproofing / excavation$7,000–$15,000 typical; full excavation with drains and membrane about $20,000 or moreMajor excavation sometimes over $20,000
    Crack repairEpoxy injection $800–$1,500 per crackNot priced separately
    Sealants and waterproof paintPaint $1–$8 per sq ft; vapor barrier $1,500–$3,000Paint $2–$6 per sq ft; sealants $3–$7 per sq ft
    Grading and landscapingNot listed$1,000–$7,000

    For total project cost, This Old House estimates by basement size: about $6,260–$7,461 for 500 sq ft, $12,447–$14,833 for 1,000 sq ft, $18,634–$22,206 for 1,500 sq ft and $24,817–$29,575 for 2,000 sq ft. Modernize instead reports a typical total of $1,500–$7,000 with a national average around $5,000, and a full range of $500 to over $20,000.

    Why the numbers do not agree

    We did not average the two sources, because they are not measuring the same thing. The differences most likely come from scope and definitions:

    • What is being priced. A pump-only job and a complete interior drainage system with a pump are very different projects, yet both are often called “sump pump installation.”
    • Whole basement or one problem. Size-based totals assume treating the whole basement. “Typical” totals across all jobs include many small repairs.
    • Data source and date. One guide states where its data comes from and when it was updated. The other does not.
    • Inconsistency inside a single guide. Even one source gives two different ranges for interior drain tile in different sections.

    The practical conclusion: treat these figures as planning ranges, not quotes, and use them to spot a bid that looks far outside the range for the scope described.

    What drives the price of your job

    • Foundation type and condition. Block walls and older homes can cost more, and may need structural work first.
    • Basement size and depth, which sets how many linear feet of drain or wall must be treated.
    • Interior versus exterior work. Exterior work means excavation and is usually the most expensive. See interior vs. exterior waterproofing.
    • Your location, including labor rates, soil, permits and flood risk.
    • How severe the water damage is, including tearing out finished walls and floors.

    Costs people forget

    • Permits and inspections: from $75 to $500 according to This Old House, and up to $500 according to Modernize.
    • Gutters and downspouts: This Old House lists $650–$1,750 for gutter work, which can matter if roof water is part of the problem.
    • Mold removal: $500–$3,500 per This Old House but often $4,000 or more per Modernize, another example of how much these estimates vary.
    • Water damage repair: This Old House reports $1,360–$6,290.

    Try the lower-cost fixes first

    The U.S. Environmental Protection Agency advises fixing water that enters from outside, with options that range from simple landscaping to major excavation and waterproofing, and says the ground should slope away from the foundation. It also notes that missing gutters or water flowing toward the house can cause basement water problems (EPA). Extending downspouts and correcting grading cost far less than a drainage system, so rule them out before accepting a large bid. Our exterior drainage guide covers these surface fixes.

    What a written quote should spell out

    • Whether the work is interior or exterior, and the linear feet of drain or wall covered.
    • The sump pump model, whether a battery backup is included, and where the water discharges.
    • Permits, cleanup, and any restoration work, and who is responsible for each.
    • The warranty terms and whether it transfers if you sell the house.
    • The payment schedule. Be cautious about large deposits before work starts.

    Get at least three written quotes for the same scope. Our guide on hiring a waterproofing contractor covers the questions to ask and the red flags to watch for.

    Your right to cancel a contract signed at home

    The Federal Trade Commission’s Cooling-Off Rule requires sellers who make certain sales at your home or other non-business locations to tell you that you can cancel within three business days. The rule applies above a minimum purchase amount and has exceptions, and many states add their own protections. Check the rule text (16 CFR Part 429) and your state attorney general’s office before relying on it for a specific contract.

    Related guides

    How we put this guide together

    We read the two cost guides cited above and the EPA and FTC pages on October 11, 2026, and reported their figures as written, with the source named next to each number. We did not average sources or estimate regional prices, because we do not have verified regional data. When we have a better source, we will update this page and note the date.

    Sources

    Want to see the published ranges added up for your own measurements? Try our basement waterproofing cost calculator.

  • Basement Humidity Levels: What Is Normal and What to Do About It

    Basement Humidity Levels: What Is Normal and What to Do About It

    Last updated: October 21, 2026. General information, not medical, engineering or legal advice.

    A basement that smells musty or feels clammy is telling you something, but not always the same thing. It might simply be humid air, it might be condensation on cold surfaces, or it might be water actually moving through the walls. The fix is different for each, so the first job is to measure and diagnose before you spend money.

    The short answer

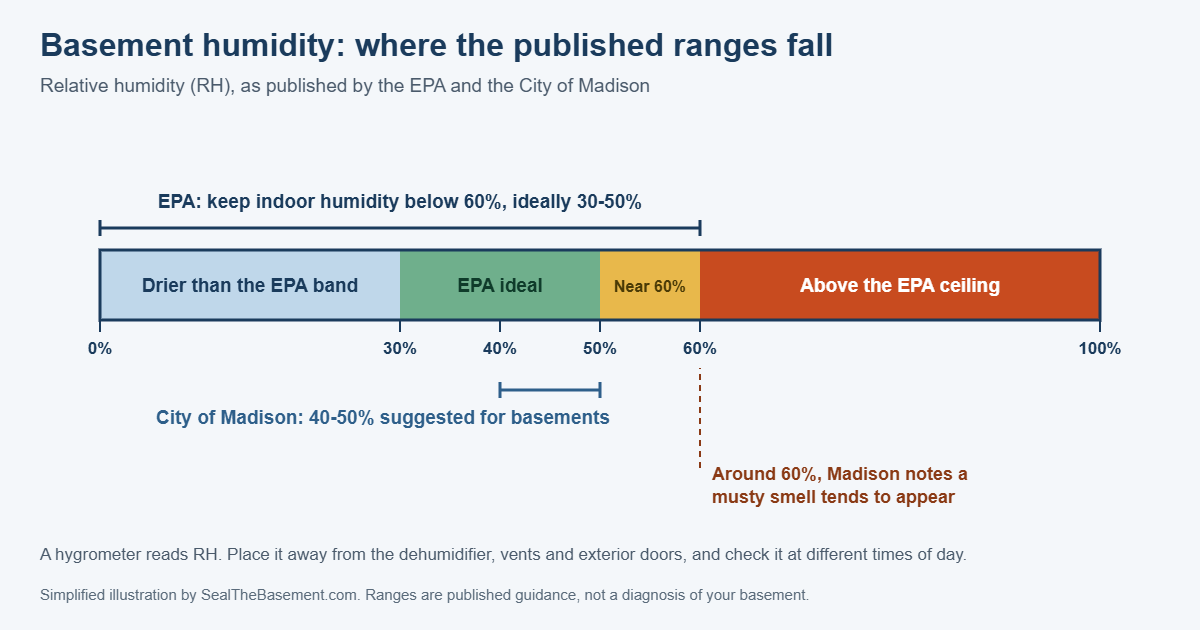
    The U.S. Environmental Protection Agency recommends keeping indoor relative humidity below 60 percent, ideally between 30 and 50 percent. The City of Madison suggests 40 to 50 percent for basements and notes that around 60 percent tends to produce a musty smell. If your readings sit above that range for weeks, you have a moisture problem to solve, not just a smell to cover up.

    Bar chart of relative humidity from 0 to 100 percent: below 30 is drier than the EPA band, 30 to 50 is the EPA ideal range, 50 to 60 is near the ceiling, and above 60 is over the EPA recommended limit; the City of Madison suggests 40 to 50 percent for basements
    Simplified illustration by SealTheBasement.com, based on the EPA and City of Madison ranges quoted above.

    How to measure basement humidity

    You need a hygrometer, a small meter that reads relative humidity. The EPA says one costs roughly $10 to $50 at a hardware store. Place it away from the dehumidifier, vents and exterior doors, at about waist height in the middle of the space. Read it at different times of day and through the seasons, because summer air carries more moisture and a basement that feels fine in March can read 65 percent in July.

    ReadingWhat it suggestsWhat to do
    Below 30%Drier than the EPA’s ideal bandUsually nothing. Check that you are not over-drying with a dehumidifier
    30–50%Within the EPA’s ideal rangeMaintain current habits
    50–60%Acceptable by the EPA’s upper limit, but approaching the point where musty odors appear (Madison)Run a dehumidifier; look for sources
    Above 60%Above the EPA’s recommended ceilingTreat as a problem: find and fix moisture sources

    Why basements run damp

    • Concrete is porous. Madison notes that concrete lets some moisture through, so a certain amount of humidity is normal in a basement.
    • Water outside the walls. Poor grading, short downspouts and clogged gutters push water toward the foundation. The EPA recommends clean gutters and soil that slopes away from the house.
    • Indoor sources. Clothes dryers, stoves, and bathrooms without vents add moisture. The EPA advises venting dryers outdoors and running bathroom fans.
    • Cold surfaces. Cold pipes and walls can collect condensation, and the EPA suggests insulating cold pipes.
    • Past leaks. Wet carpet, cardboard and wood hold moisture and keep the air damp long after the leak stops.

    Humidity or an actual leak?

    High humidity does not necessarily mean water is coming through the walls, but the two can overlap. These observations help you tell them apart:

    • Timing. Humidity that jumps after rain points to water entry. Humidity that peaks on warm, muggy days points to condensation or outdoor air.
    • Where the dampness appears. Wet patches at the base of the wall or along the floor joint suggest water pressure from outside. Beaded water on cold pipes suggests condensation.
    • Visible signs. White powder on masonry (efflorescence), stains, peeling paint or standing water suggest moisture movement.
    • The foil check. A common homeowner test is to tape a square of aluminum foil tightly to the wall for a day or two. Moisture on the room side of the foil suggests condensation from room air. Moisture behind it suggests water coming through the wall. It is a rough indicator, not a diagnosis.

    Ways to lower humidity, cheapest first

    • Fix outside water first. Extend downspouts, clean gutters, and slope soil away from the house. Madison recommends doing this before any below-ground drainage because it may solve the problem alone. See our exterior drainage guide.
    • Vent moisture sources. Dryers outside, bathroom fans running, no unvented heaters.
    • Run a dehumidifier. The EPA lists dehumidifiers among ways to control indoor moisture. Empty it or plumb it to a drain, and keep the filter clean.
    • Insulate cold pipes to cut condensation.
    • Dry wet materials within 24 to 48 hours. The EPA says this prevents most mold growth after a leak or flood.
    • Address water entry. If the foil check or the pattern of dampness points to a leak, see water seeping through walls after rain and the cost guide.

    Paint and sealers will not fix humidity

    Fixr prices waterproof paint and sealers at roughly $1 to $8 per square foot. They can slow moisture passing through a wall, but the Building America foundation handbook from Oak Ridge National Laboratory notes that dampproofing does not stop water under hydrostatic pressure. Paint over a wall that is actively wet and you may end up with peeling paint and the same moisture behind it.

    When high humidity means call someone

    • Readings above 60 percent that stay there despite a dehumidifier.
    • Visible mold, especially if it covers more than about 10 square feet.
    • Water on the floor, or damp walls after every rain.
    • Cracks that leak. See our crack injection guide.

    A simple 30-day plan

    • Week 1: buy a hygrometer and write down readings morning and evening, along with the weather and whether it rained.
    • Week 2: walk the outside of the house after a rain. Check that downspouts discharge away from the foundation, gutters are clear and soil slopes away. Fix what you find.
    • Week 3: run a dehumidifier sized for the space, and keep doors to the basement closed so it is not fighting the whole house. A setting around 45 to 50 percent sits inside both the EPA and Madison ranges.
    • Week 4: compare your readings with week 1. If they have fallen into the 30 to 50 percent range and the dampness stopped, you were dealing with humidity. If walls are still damp after rain, treat it as water entry and get quotes.

    Do not ignore a musty smell

    Madison notes that around 60 percent humidity tends to bring a musty smell. The smell is not the problem; it is the hint. If you notice it, measure first, then look for hidden moisture: behind stored boxes, under carpet and along the base of exterior walls. If you find mold, follow the EPA’s guidance and fix the moisture source rather than only cleaning the surface.

    How we put this guide together

    This guide was drafted with AI assistance and then edited for the site against the public sources listed below. We are not engineers, doctors or remediation contractors. Humidity targets come from the EPA and the City of Madison; the foil check is a commonly used homeowner method rather than a sourced standard. If you spot an error, use the contact page and we will correct it.

    Sources

  • How to Waterproof a Basement Wall from the Inside: What Works and What Does Not

    How to Waterproof a Basement Wall from the Inside: What Works and What Does Not

    Last updated: October 11, 2026. General information, not engineering advice. Wear eye protection and gloves when working with cement, acids or sealers.

    Sealing a basement wall from the inside is the do-it-yourself project most homeowners try first, because it is cheap and does not require digging. It can be the right answer for mild dampness. It is usually the wrong answer for water that is pushing through the wall under pressure. This guide shows how to do the job properly, how to tell which situation you have, and when to stop and call someone.

    The short answer

    This Old House describes waterproof paint or sealer alone as usually a temporary fix unless the moisture is very mild, and says interior treatments typically last about 10 years depending on drainage and soil. Common causes such as clogged gutters, poor grading and groundwater pressure are outside problems that sealing the inside cannot solve. Treat interior sealing as one step in a larger plan, not the plan itself.

    Empty unfinished basement with a painted concrete floor, steel support posts, exposed ceiling beams and a staircase
    Stock photo by Josh Lemmon on Unsplash. Illustrative only; not one of our projects.

    Step 0: find out where the moisture comes from

    Before you buy any product, find out whether you are dealing with condensation or water coming through the wall. Two simple tests are commonly recommended:

    • Foil test. This Old House suggests taping a one-foot square of aluminum foil to the wall for 24 hours. If the side facing the wall is damp, water is coming through from outside. If the outer face is damp, the moisture is condensation from room air.
    • Plastic sheet test. Green Building Canada describes a similar plastic-sheet test to tell seepage from condensation, and suggests calling an expert if the source is unclear.

    Also look at timing. Dampness that follows heavy rain suggests water entry. Our guide to water seeping through basement walls after rain can help you read what you see, and our basement humidity guide covers condensation.

    Is interior sealing enough? A quick check

    What you seeInterior sealing likely to help?Better next step
    Mild dampness, no standing water, wall otherwise soundPossiblyFix gutters and grading first, then seal
    Damp wall after every rainOnly temporarilyFix exterior water; consider drainage
    Water running or pooling on the floorNoDrainage and sump; see interior vs. exterior guide
    Bowing wall, large or growing cracksNoStructural engineer first
    Mold over about 10 sq ftNot by itselfProfessional remediation; see mold guide

    Step 1: prepare the wall

    • Inspect. Look closely at mortar joints, pipe penetrations, window wells and the joint where the wall meets the floor.
    • Remove loose material. Coatings only perform on bare masonry, according to Green Building Canada, so painted walls must be stripped first.
    • Clean off efflorescence. This Old House suggests scrubbing with a wire brush, applying a diluted acid solution (it gives one part muriatic acid to four parts water), rinsing and letting the wall dry fully. If you use any acid, wear gloves and eye protection and add acid to water, never the reverse.
    • Let the wall dry. Sealers do not bond well to damp masonry.

    Step 2: repair cracks and gaps

    • Small cracks of about 1/4 inch or less can be filled with masonry caulk, per This Old House.
    • For larger cracks, clean out debris, dampen the crack and press hydraulic cement in. For large gaps or active leaks, chisel a V-shaped groove and press cement in from the bottom up, in small batches because it sets quickly, then let it cure before sealing. Our hydraulic cement guide walks through it.
    • Seal the wall-floor joint as well. Green Building Canada recommends sealing cracks and the cove joint before coating.
    • Horizontal or stair-step cracks, and cracks that are growing, are not patch jobs. See crack injection and talk to an engineer.

    Step 3: apply a below-grade coating

    1. Choose a product rated for below-grade masonry. Green Building Canada notes that elastomeric and crystalline-based coatings are designed for this use. Check the label, including whether it can be applied in your temperature range.
    2. Apply the first coat evenly with a roller or brush and let it dry, usually 2 to 4 hours (This Old House).
    3. Apply a second coat perpendicular to the first. Add a third if the manufacturer recommends it.
    4. Follow the cure time on the label before putting anything against the wall.

    This Old House adds that for more severe moisture problems, the paint should be paired with another sealer or approach rather than relied on alone.

    What it costs

    Fixr prices waterproof paint and sealers at roughly $1 to $8 per square foot. This Old House lists a full interior vapor barrier at $1,500 to $3,000 for full coverage, and a typical interior drainage job at about $3,000 on average. Compare those with sealing costs before deciding: if you will repeat the coating every few years and still have water, a drainage system may be better value. See the cost guide.

    What a coating cannot do

    • It will not stop water pushing through under pressure. The Building America foundation handbook from Oak Ridge National Laboratory notes that dampproof coatings do not stop water under hydrostatic pressure.
    • It will not fix bad grading, gutters or a high water table.
    • It will not repair a structural crack.
    • It will not control humidity on its own. Green Building Canada recommends a dehumidifier.

    A caution about interior vapor barriers and finishing

    Green Building Canada, writing about Canadian homes, warns against installing interior vapor barriers on below-grade walls without moisture control, because they can trap moisture and promote mold, and it recommends vapor-permeable insulation instead. Rules differ by region and by building code. If you plan to finish the basement, ask a local inspector or licensed contractor before covering the walls, and never frame against a wall that is still taking in water.

    When to call a professional

    • Structural damage or foundation problems.
    • A high local water table.
    • Mold covering more than about 10 square feet.
    • Recurring or severe water problems.
    • You do not have the time or skills for the work.

    Those are This Old House’s own criteria. If you hire, get at least three quotes, ask about warranties, and confirm the contractor is insured. This Old House notes waterproofing contractors generally do not need a specialized license, though rules vary by state, so check yours. Our guides on hiring a contractor and interior vs. exterior waterproofing help.

    Related guides

    How we put this guide together

    This guide was drafted with AI assistance and then edited for the site against the public sources listed below. We are not engineers or contractors. One source is Canadian, and we flag where it may differ from U.S. practice. If you spot an error, use the contact page and we will correct it.

    Sources

  • Basement French Drain Cost in 2026: Per-Foot Prices, Examples and Quote Tips

    Basement French Drain Cost in 2026: Per-Foot Prices, Examples and Quote Tips

    Last updated: October 11, 2026. General information, not engineering or legal advice. Prices are published national figures and will differ in your area.

    “French drain” covers three different jobs: a shallow trench in the yard, a drain along the outside footing, and a drain cut into the basement floor. They do not cost the same, and many online prices blur them together. This guide separates them so you can read a quote correctly.

    The short answer

    LawnStarter (updated October 2026) puts the average professionally installed French drain at about $5,000, with most projects between $1,650 and $12,250 and extremes from about $500 to $18,000. Exterior drains are cheaper per foot than interior ones, because an interior drain means cutting and repairing a concrete floor.

    Cost per linear foot

    SourceExterior / yard drainInterior perimeter drain
    LawnStarter (Oct 2026)$10–$65 per linear foot$40–$100 per linear foot
    Fixr (Feb 2026)$10–$100 per linear foot$40–$120 per linear foot
    This Old House (Mar 2026)$10–$100 per linear foot (French drains)$60–$120 per linear foot for a weeping tile system; a different section lists $25–$55 for subfloor drain tile

    Note that This Old House gives two different interior figures in the same article. That kind of internal inconsistency is common in cost guides, which is why you should always price your own job by length and scope.

    Typical totals by length

    LengthExterior (LawnStarter)Interior (LawnStarter)
    50 feet$500–$3,250$2,000–$5,000
    100 feet$1,000–$6,500$4,000–$10,000
    200 feet$2,000–$13,000$8,000–$20,000

    For a basement about 30 by 33 feet, the perimeter is roughly 126 feet. At LawnStarter’s interior range of $40 to $100 per foot, a full perimeter drain would run about $5,040 to $12,600, before the sump pump. That is our arithmetic, not a quote. It shows why a full interior system is often a four- or five-figure job.

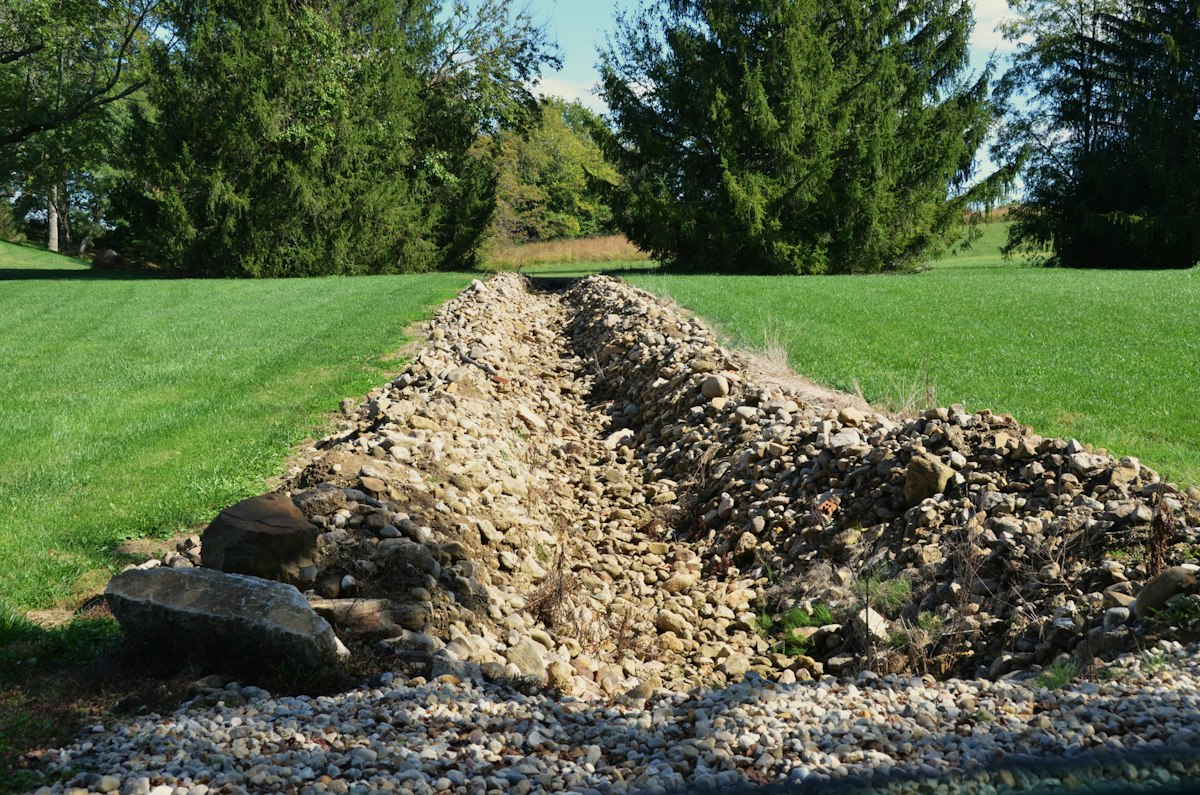
    Narrow trench in a grassy yard filled with gravel and stones
    Stock photo by Roger Starnes Sr on Unsplash. Illustrative only; not one of our projects.

    Three kinds of “French drain”

    • Yard (surface) drain. A trench with gravel and perforated pipe that carries runoff away from the house. Shallower and cheaper.
    • Exterior footing drain. A drain at the base of the foundation. LawnStarter says footing drains sit at least a foot deep and cost more than shallow ones. Installing one on an existing home usually means excavating, which is the main cost. See interior vs. exterior waterproofing.
    • Interior perimeter drain. Cut into the basement floor along the walls and routed to a sump pit. Madison describes it as a perforated pipe placed inside the footing perimeter that requires cutting out the slab edge.

    What drives the price

    • Soil. Shale and clay are harder to dig, especially for deep footing drains.
    • Access. If equipment cannot reach the area, hand digging adds time.
    • Materials. LawnStarter lists pipe at about $0.50 to $3 per foot and pea gravel at about $25 to $53 per ton. Labor and equipment make up most of the cost.
    • A sump pump. Needed when gravity cannot carry the water away. See our sump pump buyer’s guide.
    • Add-ons. Dry wells, storm drain connections, rain gardens or decorative covers raise the total.
    • Permits. LawnStarter lists about $58 to $225; Fixr lists $75 to $500.
    • Landscaping and surface repair. Rarely included unless the quote says so.

    Will a French drain fix your basement?

    It depends on where the water comes from. If rain runs toward the house because of poor grading or short downspouts, Madison’s guidance says to fix those first, since they may solve the problem alone. A drain only works if water can reach it and there is somewhere for it to go: the pipe must drain by gravity to daylight, or to a sump pit with a working pump. Our comparison of French drain vs. sump pump explains how the two work together, and the full cost guide places this price in context.

    Cheaper things to try before you dig

    A drain is a response to water that is already collecting near the foundation. Cutting off that water at the source is usually cheaper. Fixr lists gutters and downspouts at about $3 to $30 per linear foot, and extending downspouts or re-sloping soil away from the house can cost less still. Madison’s guidance recommends this order: grading and gutters first, then exterior drainage, then interior drainage. Our exterior drainage guide covers these surface fixes.

    Two example budgets, worked out

    These examples use the published ranges above. They are illustrations, not quotes.

    • A 100-foot yard drain to move runoff away from a low spot. LawnStarter’s exterior range for 100 feet is $1,000 to $6,500. The wide spread reflects depth, soil and access.
    • A full interior perimeter drain in a 126-foot basement. At $40 to $100 per foot, that is about $5,040 to $12,600, plus a sump pump if there is no pit yet. LawnStarter’s own table for 100 feet interior ($4,000 to $10,000) and 200 feet ($8,000 to $20,000) brackets the same result.

    Even with generous assumptions, a basement drain system costs several times what a yard drain does. If one quote is far below the other, find out whether it covers the same footage, the same depth and a pump.

    Mistakes to avoid when comparing quotes

    • Comparing a per-foot yard drain price to a total price for an interior system.
    • Assuming a drain includes restoration of concrete, landscaping or sod. Ask.
    • Ignoring where the water will discharge. A drain with nowhere to send water will back up.
    • Skipping the permit. Rules vary by city, and Madison, for one, requires permits for sump pumps.
    • Choosing on price alone. A cheap quote that leaves out the pump or the discharge line can cost more in the end.

    Getting an honest quote

    • Ask which type of drain is being priced and its length in linear feet.
    • Ask what depth, pipe, gravel and filter fabric are included.
    • Ask where the water will go, and whether a pump or permit is needed.
    • Ask whether surface restoration (sod, concrete, landscaping) is included.
    • Compare at least three itemized quotes; our guide on hiring a contractor covers licenses, contracts and deposits.

    Related guides

    How we put this guide together

    This guide was drafted with AI assistance and then edited for the site against the public sources listed below. We are not contractors or engineers, and the prices are not quotes. Per-foot and total figures come from the cited cost pages as of their stated dates; the perimeter calculation is ours. If you spot an error, use the contact page and we will correct it.

    Sources

  • How to Choose a Sump Pump: Types, Sizing, Backup Options and What They Cost

    How to Choose a Sump Pump: Types, Sizing, Backup Options and What They Cost

    Last updated: October 20, 2026. General information. Your pump’s manual comes first, and anything involving electricity or plumbing repairs may need a licensed professional.

    Most “best sump pump” lists are really affiliate lists. This guide takes a different approach: it explains the features that matter, how the main types differ, what published sources say about lifespan and cost, and how to ask a contractor the right questions. It does not rank specific models, because we have not tested any.

    The short answer

    For most homes with a basement pit, a properly sized submersible pump plus a battery backup is the combination that makes sense. Pedestal pumps are cheaper and easier to service but sit above the pit, and water-powered backups are an alternative where there is reliable water pressure. What matters more than brand is correct sizing, a check valve, a proper discharge line and a working backup.

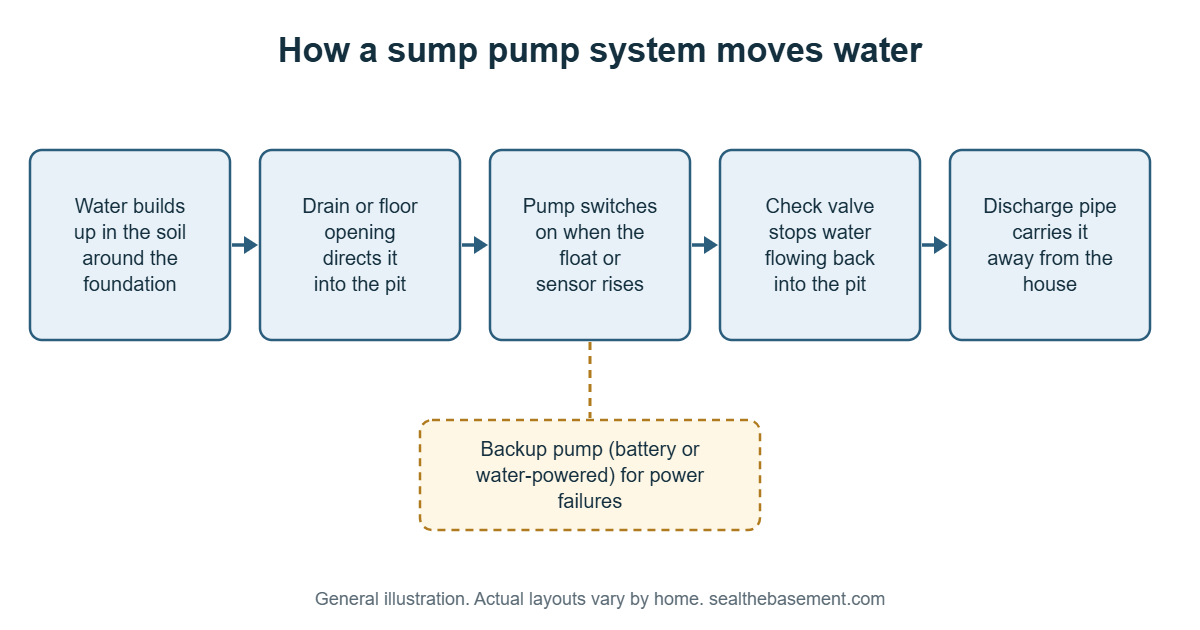
    Diagram of a sump pump system: water collects in the pit, the pump pushes it through a check valve and discharge pipe away from the house, with a backup pump for power failures
    Simplified illustration by SealTheBasement.com. Actual layouts vary by home.

    Pump types compared

    TypePublished installed price (Four Seasons, March 2026)Pump alone (Bob Vila, Jan 2024)Notes
    Pedestal$800–$1,500$60–$170Motor sits above the pit. Four Seasons lists a 25 to 30 year lifespan
    Submersible$1,200–$3,000$100–$400Sits in the pit. Four Seasons lists a 5 to 15 year lifespan
    Water-powered backup$1,200–$2,500$100–$700Uses water pressure; needs a working supply
    Battery-powered backupComplete systems about $600–$1,500$150–$800Check runtime and keep the battery maintained

    These sources disagree in places, and one is a contractor’s own page, so use them as ranges. Estes Services and Farmers both say most pumps last roughly 7 to 10 years, which sits between the extremes above.

    Sump pump or utility pump?

    A search for a pump for a flooded basement can mean two different tools. Angi describes a utility pump (also called a transfer pump) as portable: you plug it in, connect a garden hose or tubing, and use it to clear water that is already there. A sump pump sits in a pit at the lowest point of the home and sends water out through a fixed discharge pipe, so it is meant to prevent the flooding in the first place.

    Utility pumpSump pump
    JobCleanup after water has arrivedRun automatically to keep water from collecting
    Where it livesPortable, indoors or outdoorsIn a pit in the lowest part of the basement or crawl space
    DischargeHose or tubing, so you choose where the water goesDischarge pipe to the outside of the home
    Published price (Angi, updated July 2026)$50 to $250Pedestal $60 to $170, submersible $50 to $400; professional installation $1,200 to $2,500

    Angi does not say how either type handles silt or debris, so check the pump’s manual for what it is rated to pass before using it on muddy water. If water is standing near outlets, appliances or the electrical panel, stay out of it and call a licensed electrician or your utility before using any pump.

    Horsepower and sizing

    Four Seasons lists installed prices by horsepower, from $800 to $1,200 for a 1/4 hp pump up to $2,000 to $3,500 for 1 hp or more. A bigger motor costs more, but it is not automatically better. The right pump depends on how much water enters the pit, how high the water must be lifted, and the length of the discharge run. Ask any installer how they sized the pump for your house, and for the flow rating at your discharge height.

    Features worth paying for

    • A check valve. Ann Arbor says one should be installed on the discharge line just above the sump.
    • A weep hole above the pump to prevent airlock.
    • Battery backup. Four Seasons lists standard batteries at about three to five hours of runtime and deep-cycle batteries at about eight to twelve hours.
    • A high-water alarm, which Ann Arbor lists among things to test.
    • An airtight, childproof pit cover. Madison says the sump needs one.
    • Accessible, replaceable components so repairs are simple.

    What the pit and discharge need

    • Basin size. Four Seasons lists 18-inch and 24-inch basins. A larger pit gives the pump more room and fewer starts, but costs more to install in a concrete floor.
    • Discharge. It must end where water will not flow back toward the house, according to Madison. A buried line may need freeze protection.
    • Permits. Madison requires a building permit for sump pumps, and curb or storm inlet discharges require an excavation permit and a pre-qualified contractor.

    How to compare quotes

    • Pump make, model, horsepower and flow rating.
    • Whether it includes the pit, cover, check valve, discharge line and permit.
    • Backup type and expected runtime.
    • Warranty length and what voids it.
    • Who services it afterward.

    Then compare at least three itemized bids. Our hiring guide shows how, and the cost guide shows what to expect.

    Which setup fits which situation

    Your situationReasonable starting pointWhy
    Existing pit, occasional water, power is reliableReplace like-for-like with a properly sized pump; add a check valve if missingReplacement is quicker and cheaper than a first install (Bob Vila)
    Basement that has flooded before, or a finished spacePrimary pump plus a battery or water-powered backupStorms often cause outages; backup runtime is 3 to 12 hours depending on battery (Four Seasons)
    No pit yet, concrete floorGet itemized quotes for the pit, pump, discharge and permitConcrete floors drive cost: Bob Vila lists $2,500 to $5,000, Four Seasons $2,800 to $6,200
    Crawl space or dirt floorA simpler pit is cheaper to installFour Seasons lists much lower pit costs for dirt floors
    Pump runs constantlyInvestigate the water source before buying a bigger pumpGrading, gutters or drainage may be the real cause

    Buying mistakes to avoid

    • Choosing on horsepower alone, without asking how the pump was sized.
    • Skipping the check valve or the backup to save a few hundred dollars.
    • Buying a cheap pump and never testing it. An untested pump may fail the first time it matters.
    • Ignoring the discharge. A pump that sends water back toward the house just recirculates it.
    • Assuming a long warranty covers outages or neglect. Read the exclusions.
    • Treating the pump as the whole solution when water is entering because of poor drainage outside.

    Maintenance affects value more than model

    Any pump fails faster if the pit is full of silt, the float sticks or the discharge is blocked. A schedule like the one in our sump pump maintenance checklist protects your investment. If a pump fails, start with our troubleshooting guide.

    When a pump is not the answer

    If the water is entering because of grading or gutters, fix those first (Madison). If you are choosing between a drain system and a pump, see French drain vs. sump pump and the French drain cost guide.

    Related guides

    How we put this guide together

    This guide was drafted with AI assistance and then edited for the site against the public sources listed below. We are not plumbers or electricians. We have not tested any pump models. The utility pump comparison comes from Angi. Prices and lifespans come from the cited pages, one of which is a contractor’s marketing page. If you spot an error, use the contact page and we will correct it.

    Sources

  • Basement Water Seeping Through Walls After Rain: How to Find the Cause and Fix It

    Basement Water Seeping Through Walls After Rain: How to Find the Cause and Fix It

    Last updated: October 11, 2026. General information, not engineering advice.

    Water seeping through a basement wall after rain is one of the most common complaints, and one of the easiest to misdiagnose. The wet spot is where water appears, not necessarily where it enters. This guide shows how to work out the real path and which fix matches which cause.

    The short answer

    Water reaches basement walls after rain because the soil outside gets saturated and presses water through cracks, joints and pores, or because surface water pools at the foundation. The Oak Ridge National Laboratory foundation handbook notes that dampproofing does not stop water under hydrostatic pressure, and the City of Madison recommends fixing grading and gutters before any below-ground drainage because they may solve the problem alone.

    Four main pathways

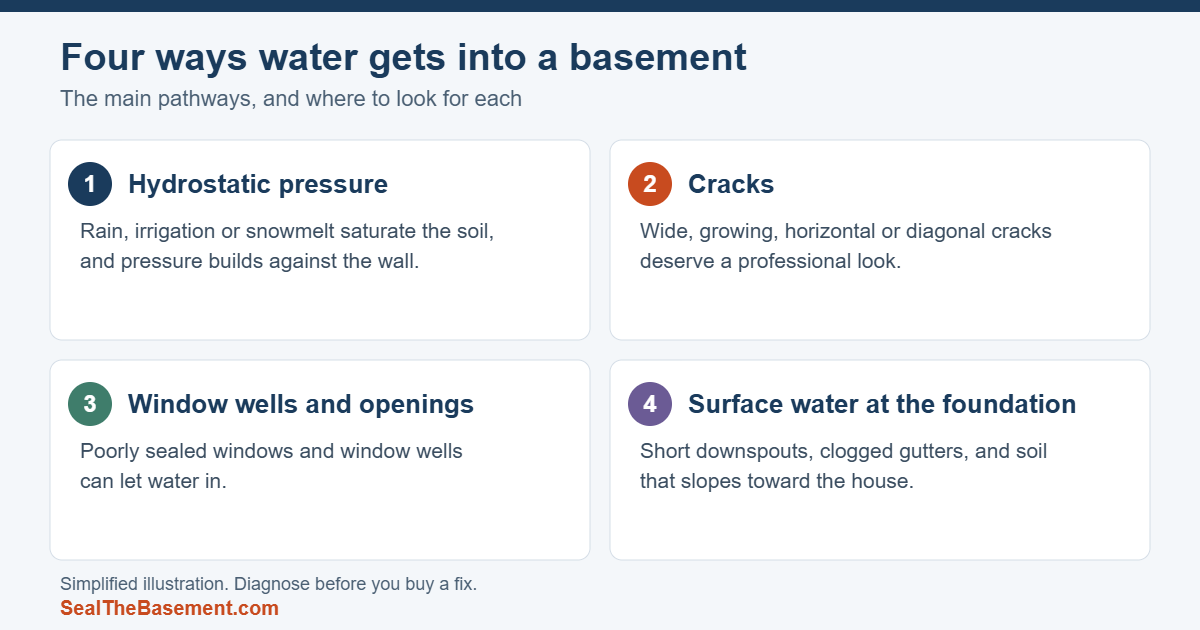
    • Hydrostatic pressure. When rain, irrigation or snowmelt saturate the soil, pressure builds against the wall. ORNL says waterproofing is recommended where such pressure can occur. Seepage tends to appear along the wall-floor joint or across the wall face.
    • Cracks. This Old House says wide, growing, horizontal or diagonal cracks deserve professional attention, and that hairline cracks are often cosmetic. Water that follows one crack often leaves staining or efflorescence along its path.
    • Window wells and openings. The Building America Solution Center lists poorly sealed windows and window wells as a way water enters below-grade spaces.
    • Surface water at the foundation. Short downspouts, clogged gutters and soil that slopes toward the house concentrate water at the wall. The EPA and Madison both cite these.
    Illustration listing four ways water enters a basement: hydrostatic pressure, cracks, window wells and openings, and surface water
    Simplified illustration by SealTheBasement.com.

    How to diagnose it

    1. Go down during the next rain. Mark where water appears with chalk or tape and note how long after the rain it starts.
    2. Check the weather pattern. Seepage that starts during rain suggests surface or soil-side water; seepage a day or two later suggests saturated soil and groundwater.
    3. Look outside. Check gutters, downspout outlets, soil slope and any window wells for standing water or debris. Our exterior drainage guide covers grading and gutter fixes.
    4. Test for condensation. Tape foil to the wall for 24 hours (This Old House). If the wall side is damp, water is coming through.
    5. Trace staining. Efflorescence and stains often line up with a crack or joint.
    6. Look for movement. Horizontal cracks, bowing, sticking doors or sloping floors need an engineer first (Bob Vila).

    Which fix matches which cause

    CauseStart hereIf it persists
    Roof water and surface runoffClean gutters, extend downspouts (5 to 10 feet per Pro Builder), regradeExterior drainage; see exterior drainage
    Small stable crack seeping waterHydraulic cement or caulk; see our crack guideInjection by a pro
    Seepage at the floor joint after stormsFix surface water firstInterior drain and sump; see interior vs. exterior
    Water around a windowClear the well and its drain; keep soil below the sillCheck grading and well drainage
    Horizontal crack or bowingStructural engineerDo not rely on patching
    Damp walls, no active leakMeasure humidity; see the humidity guideDehumidifier and ventilation

    Interior coatings and why they fail

    This Old House says waterproof paint alone is usually a temporary fix unless the moisture is very mild, and that interior treatments typically last about 10 years depending on drainage and soil. If the paint blisters after rain, the pressure is still there. Our guide to waterproofing a basement wall from the inside shows what coatings can and cannot do.

    When to get professional help

    • Recurring or severe water problems, or a high water table (This Old House).
    • Water coming through the wall in many places.
    • Horizontal or growing cracks, bowing walls or other signs of movement.
    • Mold over about 10 square feet (EPA).

    Compare at least three itemized quotes, ask about warranties and verify licensing. See how to hire a contractor and the cost guide.

    Dry the space and prevent mold

    Dry wet materials within 24 to 48 hours, as the EPA advises, and keep humidity below 60 percent, ideally 30 to 50 percent. See our basement humidity guide.

    Soil, timing and what it tells you

    Soil matters. This Old House says exterior work is recommended in clay-soil regions, where hydrostatic pressure is a bigger issue, and for persistent flooding where owners plan to stay long-term. If water arrives hours after rain stops, saturated soil is the likely source. If it arrives during rain, look at surface runoff.

    Keep a simple rain log

    Date and rainWhere water appearedTime it startedWhat was different outside
    Example: heavy rain, 1 inchNorth wall base2 hours after rain beganDownspout on that corner discharging at the wall
    Example: light all-day rainWindow wellNext morningWell full of leaves

    After two or three storms, patterns emerge, and a pattern is what a contractor needs to quote the right fix rather than the one they sell.

    What not to do

    • Do not paint over the wall and call it fixed. Paint over active seepage tends to fail.
    • Do not patch every crack before you know where the water is coming from.
    • Do not buy a pump first if downspouts are dumping at the wall.
    • Do not sign for a full system without itemized quotes. For reference, This Old House lists interior work at about $3,000 on average and exterior work at about $7,000 for a 1,000 sq ft basement, and sump pump installation at $1,200 to $2,500; see our cost guide.

    Related guides

    How we put this guide together

    This guide was drafted with AI assistance and then edited for the site against the public sources listed below. We are not engineers or contractors. Pathways and fixes combine sources from ORNL, Madison, the EPA, This Old House, Bob Vila and the Building America Solution Center. If you spot an error, use the contact page and we will correct it.

    Sources